
I want to provision my homelab physical servers, as if they were cloud VMs, with little user interaction.
For a complete “no touch” installation, I use 2 USB sticks, one for booting a temporary OS, and the other for providing the cloud-init autoinstall config.
I found this whole topic pretty confusing when I started to explore it. The first half of this post is a deep dive into the automation components used, and the second half is the actual technical steps – feel free to jump directly to the second half.
After reading this article, you’ll have an in-depth understanding of how to automate Ubuntu server installations using cloud-init.
What is cloud-init?
cloud-initis a service that runs at boot to provision a server or VM.cloud-initprovides the ability to add SSH keys, provision disks, install applications, setup users, and more – all before the first “real” user interaction.cloud-inituses datasources (for example: GCP, AWS, Azure, NoCloud) as a way to abstract the configurations per cloud provider.By default, cloud-init runs once; only on the first boot. It tracks the first boot by comparing the instance ID in the cache (
/var/lib/cloud/data) against the instance ID at runtime.On first boot
cloud-initattempts to automatically find the datasource; unless something likeds=DATASOURCE[;key=val;key=val]is specified on the kernel boot command line. By using a USB volume namedCIDATA,cloud-initautodetects that we’re using the “NoCloud” datasource.There’s one required configuration object named “meta-data”, with no extension, and is typically used by cloud providers to parameterize their instance data (left intentionally blank in this demo). The “user-data” file or object is used for configuring the “on boot” OS instructions.
Why not Ansible?
Ansible requires a fully provisioned OS that you have SSH access to before running playbooks. By using cloud-init and autoinstall, I can automatically include my SSH keys that Ansible uses and configure things like the hostname, proxies, or DNS settings before the machine boots. I’ve included a couple of sample Ansible commands in my real-life demo.
Most people quickly click through their OS setup and then use Ansible. When there are 5+ servers to rebuild, it becomes a daunting task that should be automated. I rebuild servers often because I like to start from scratch when writing posts, and it’s a good security practice.
Lastly, you could use cloud-init to do a lot of the server configuration steps, as Ansible would. It’s then a matter of personal preference regarding how you want to manage your servers. I personally like the idea of keeping cloud-init focused only on the OS provisioning automation and then using Ansible for everything “on top.”
My solution also lends itself to repeatable OS base installs too, so each server setup is close, if not identical.
Prerequisites
- 2 USBs with 4 GB+ storage
- An Ubuntu 22.04 LTS host with USB ports
To make the process 100% “no touch,” I also set the host’s BIOS to give USB devices boot priority and I set up fixed IP reservations for each host. This way, after plugging in the USBs, a reboot triggers an installation and the target host eventually boots with the same IP. However, those steps aren’t technically prerequisites.
Solution deep-dive
- Create a bootable live-server USB to act as the live, in memory, OS provisioner
- Modify the grub boot file to allow unprompted destructive installs (optional)
- Create another USB for a cloud-init config to launch an autoinstall module.1
- Plug in both USBs
- Boot to an auto-provisioned OS
One USB boots a temporary live-server OS in memory 💿 and discovers the installation config on the other (CIDATA) USB, triggering the installation on the targets best disk available.2
What is a live-server (temporary OS)?
A live-server refers to a special Ubuntu ISO, or installation media, used to install and configure Ubuntu servers.
The live-server ISO is special because it is preconfigured to boot in memory (from USB) and comes prepackaged with installation software.

1 (not pictured) autoinstall leverages
subiquityto act as the provisioning controller; watching for events. The bulk ofsubiquityis interfacing withcurtin, a “smart installer” that handles the important tasks such as creating disks, connecting to networks, etc.2 (not pictured) curtin selects the best suitable disk to format as the main install target for the OS. It defaults to the largest non-cidata / non-live disk. If this is too spooky, you may specify exact partitions or volumes in the user-data file.
Bare metal vs. Raspberry Pi
My homelab consists of Intel NUCs and Raspberry Pis. I was hoping to share the same process for both installs, but I quickly realized I’ll need to approach them slightly differently. This is because Raspberry Pi’s are traditionally run off of a USB that already has an OS image installed.
The two-step process solution (pictured below) for bare metal is:
- Boot a temporary OS to memory
- Remotely provision the target host disk (via cloud-init [#1])
The remote provisioning includes generating a new cloud-init for the future host disk’s first boot (via cloud-init [#2]).
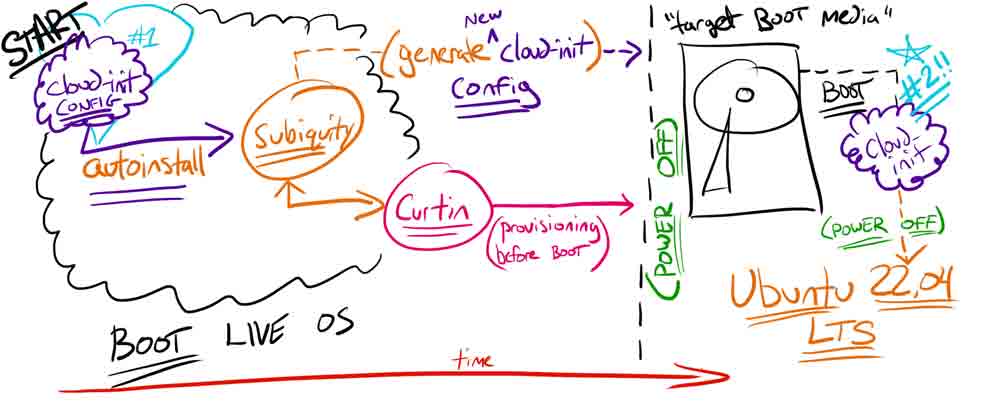
Info
Pay attention to the underlined components, they are important topics covered in later sections.
However, since the Pi installation is directly on disk, we need to copy everything on the OS image to the bootable USB and then modify the cloud-init startup configuration. As a result, the USB (pictured as a hard drive) plugs in and is the primary boot device for the Pi forever.

The key takeaway is, that the bare metal solution configures a “meta” cloud-init to launch autoinstall (which then generates a second cloud-init config for the host) and the method for a Raspberry Pi is using traditional, stand-alone, cloud-init without autoinstall because we’re editing the primary cloud-init boot device.
If you’re interested in this alternative approach, only using cloud-init (without autoinstall) by directly imaging a disk, I created a post on how to automate Raspberry Pi 4 installs of Ubuntu 22.04.
What is Ubuntu’s autoinstall?
Autoinstall “lets you answer all those configuration questions ahead of time with an autoinstall config and lets the installation process run without any interaction.” (source / docs)
Autoinstall is only available in Ubuntu 20.04 or later.
Autoinstall uses a
cloud-init-like configuration but does not have all the modules ofcloud-init. When in doubt, check autoinstall’s reference docs for the exact supported keys / values. If it’s not in the docs, it most likely won’t work.The live-server uses autoinstall directives to seed answers to configuration prompts during system installation to allow for a “touchless” or non-interactive Ubuntu system install. (source)
They both are technically cloud-init files, starting with #cloud-config, but the key difference is, that the cloud-init configuration doesn’t contain autoinstall:.
#cloud-config
autoinstall:
  version: 1
Tip
When any Ubuntu system is installed (manual or automated) an autoinstall file for repeating the installation is created at /var/log/installer/autoinstall-user-data.
Power-state trickery
Since I want to provision a bunch of servers, with no screen or keyboard, I needed to know when to remove the USB. Otherwise, each reboot would relaunch the live OS – causing a continuous OS installation loop.
The solution I came up with is adding power off events at key times.
-
The first power off is in the liver-server user-data’s
late-commands. This gives me an indication it’s time to remove the USBs because cloud-init/autoinstall has completed the initial provisioning via the live-server.#cloud-config autoinstall: ... late-commands: # shut-down the host to avoid an infinite installer loop - shutdown -h now -
The second one is after the target host performs the first boot (set by autoinstall’s generated config). Letting me know that it booted successfully and ran my first boot instructions.
#cloud-config
autoinstall:
  ...
  user-data:
    ...
    # shutdown after first host initial provisioning
    power_state:
      mode: poweroff
The “user-data:” under the autoinstall config applies to the target host system, not the installer environment. (source / example).
Additional components
Let’s get a bit deeper into the weeds. The following section isn’t critical to understand, but it does provide better context into the changes we make.
What makes the live-server boot?
I started to think about what triggered our installation automation. I know
cloud-init… but what instructs cloud-init to run. A couple of Google searches later, I found out it’s asystemd-based setup. Basically,cloud-initis enabled to run by default on startup.Ok, so
systemdlaunchescloud-initat boot, but how doessystemdknow to launchcloud-initfrom our live-server USB? Where does the config live?Looking deeper, I discovered that
casper(a hook for initramfs-tools to boot live systems) looks for media containing a/casperdirectory where the liver server root filesystems is stored. When found,caspercreates a writable environment to boot in-memory. You can find examples of people directly modifying the liver-server squashfs and rebuilding the ISO.
/casper/installer.squashfscontains the entire Ubuntu Live Server OS, including acloud-initandsystemdconfiguration.
casperleveragesinitrd(initializes a disk from RAM) andvmlinuz(a compressed kernel for the RAM disk) to provide the bootable layer for the/casper/installer.squashfsfilesystem. This is why everything “just works” -cloud-initruns on every boot (finding our ‘CIDATA’ USB volume for setup).
I tried to sketch out a different view of how all the components interact. It reads from the top to bottom; from boot to provisioned host. Pay attention to the bottom components subiquity & curtin as they’re covered in subsequent sections.
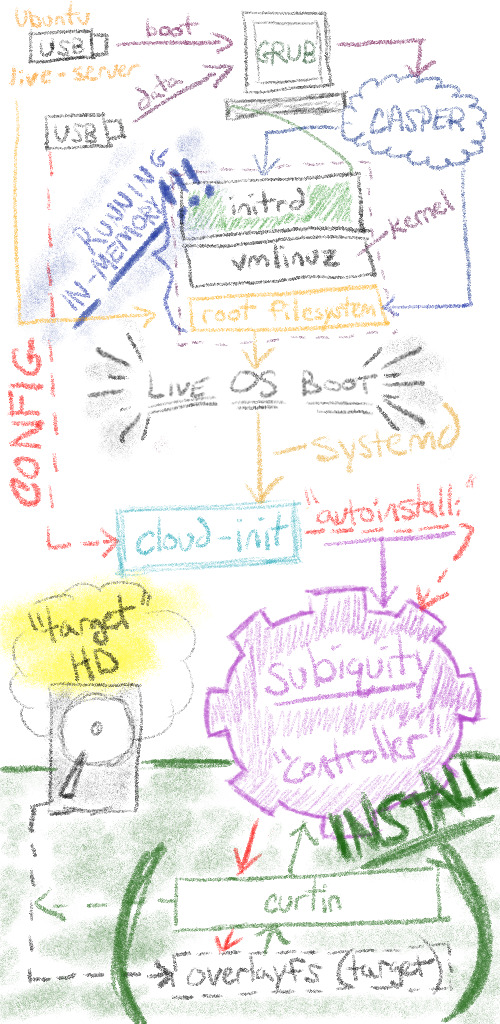
What is subiquity?
Subiquity is a python client-server application. By default,
subiquityis installed through snap on the live-server ISO. Subiquity opens up an API socket (/run/subiquity/socket) and runs [python-based] controllers to watch, and respond to, events.Subiquity is also responsible for generating a new cloud-config for the target host’s first boot.
The app design is mostly defined / constrained by the curtin config. Once the app is running and the configurations are generated (including a new
cloud-init), the subiquity controller “only” sits between curtin and the new target host. (source)
Subiquity stages
- Checks for an
autoinstallconfig (with acloud-init-like format) and runs any early commands. - Waits for all the model objects that feed into the
curtinconfig to be configured. - Waits for confirmation.
- Runs
curtin install(in multiple steps) and wait for that to finish. - Waits for the model objects that feed into the
cloud-initconfig to be configured. - Creates the
cloud-initconfig for the first boot of the installed system. - If there’s a network connection, it downloads and installs security updates.
- Runs any late commands. (source)
It’s worth getting into this level of detail because you’ll occasionally need to debug errors that come from screens that look like this:

When I was first debugging my installation errors, I felt like I was running in circles…
What is curtin?
curtin is intended to be a bare-bones “installer.” Its goal is to take data from a source, get it onto disk as quickly as possible and then boot it.
The key difference from traditional package-based installers is that curtin assumes the thing it’s installing is intelligent and will do the right thing.
Tip
Search (CTRL + F) for the term curtin on Ubuntu’s official autoinstall reference docs to see the areas managed by curtin such as disk selection (additional curtin docs).
Solution summary
A live OS is booted to memory via casper; triggering cloud-init to launch subiquity, a bunch of python controllers, to generate a cloud-init configuration for the new host and to launch curtin install for provisioning the host’s new – future – disk.
Now, let’s begin the actual tutorial! 😅
Create a bootable live-server USB
Download the latest ISO
Find the latest live-server ISO at the bottom of the 22.04 releases page.
sudo su -
export ISO="https://releases.ubuntu.com/22.04/ubuntu-22.04.1-live-server-amd64.iso"
wget $ISO
Disable installer prompts (optional)
Even if a fully non-interactive autoinstall config is found, the server installer will ask for confirmation before writing to the disks unless “autoinstall” is present on the kernel command line. This is to make it harder to accidentally create a USB stick that will reformat a machine it is plugged into at boot. (source)
Since I want the process to be 100% automated, let’s update the boot file (grub.cfg). It sounds simple, but it’s harder than it should be.
ISO’s have a very strict format and packaging structure that make them notoriously difficult to modify. To work around this, manually extract the files from the mounted read-only ISO. Then use livefs-editor to rebuild a new ISO.
Warning
To skip this section and leave the ISO as-is, jump to creating a bootable USB from live-server and remember to override the live-server boot menu options.
Mount the ISO locally to copy files
Create a directory named mnt and unpack the ISO contents locally.
export ORIG_ISO="ubuntu-22.04.1-live-server-amd64.iso"
mkdir mnt
mount -o loop $ORIG_ISO mnt
Copy the existing boot file to /tmp/grub.cfg
cp --no-preserve=all mnt/boot/grub/grub.cfg /tmp/grub.cfg
Modify /tmp/grub.cfg in the first section “Try or Install Ubuntu Server” to include ‘autoinstall quiet’ after ’linux /casper/vmlinuz.’
sed -i 's/linux \/casper\/vmlinuz ---/linux \/casper\/vmlinuz autoinstall quiet ---/g' /tmp/grub.cfg
What do the ‘autoinstall’ & ‘quiet’ parameters do?
autoinstall – a parameter that
subiquitychecks before destructively modifying disks, if the string is not present, user confirmation is required.quiet – a linux kernel parameter to disable most log messages. (source)
Tip
Instead of cidata, you can declare a different file path for the configuration in the linux boot command line. For example, to use /cdrom/server/:
linux /casper/vmlinuz autoinstall quiet ds=nocloud\;s=/cdrom/server/
Reduce the boot menu timeout
The reduced timeout means that the boot menu prompt is only up for 1 second before moving forward with the ‘autoinstall quiet.’
sed -i 's/timeout=30/timeout=1/g' /tmp/grub.cfg
Reference file: example gist
Rebuild the modified ISO
After many failed attempts to rebuild the ISO, I found an incredible tool on this fourm called livefs-editor.
Looking back, I think this askubuntu.com answer would have allowed me to build the ISO using xorriso but I didn’t understand the entire solution when I first read it (similar solution and full example).
What is livefs-editor?
livefs-editor is a python CLI tool used to edit an existing live-server ISO.
livefs-edittakes arguments for instructions on how to modify an ISO.
Setup livefs-editor
Install dependencies for livefs-editor then clone and install using pip.
apt install xorriso squashfs-tools python3-debian gpg liblz4-tool python3-pip -y

git clone https://github.com/mwhudson/livefs-editor

cd livefs-editor/

python3 -m pip install .
Use livefs-edit to create a newly modified ISO
Copy the updated /tmp/grub.cfg file over using the --cp (copy) argument.
# copy command exactly as is, it appends `-modded` to the new filename
export MODDED_ISO="${ORIG_ISO::-4}-modded.iso"
livefs-edit ../$ORIG_ISO ../$MODDED_ISO --cp /tmp/grub.cfg new/iso/boot/grub/grub.cfg
Warning
The new/iso path is the relative path livefs-edit automatically uses as a destination. Do not change this.
Copy the bootable ISO to a USB
Plug in the USB and find it with lsblk.
lsblk
For example, mine is sda (and the underlying sda1 partition). I know this because the other disk is my OS and the size is close to what I expected. Output:
NAME                      MAJ:MIN RM   SIZE RO TYPE MOUNTPOINTS
loop0                       7:0    0  61.9M  1 loop /snap/core20/1405
loop1                       7:1    0    62M  1 loop /snap/core20/1587
loop2                       7:2    0  79.9M  1 loop /snap/lxd/22923
loop3                       7:3    0    47M  1 loop /snap/snapd/16292
loop4                       7:4    0  44.7M  1 loop /snap/snapd/15534
loop5                       7:5    0   1.4G  0 loop /root/livefs-editor/mnt
sda                         8:0    1 114.6G  0 disk
└─sda1                      8:1    1 114.6G  0 part
nvme0n1                   259:0    0 465.8G  0 disk
├─nvme0n1p1               259:1    0     1G  0 part /boot/efi
├─nvme0n1p2               259:2    0     2G  0 part /boot
└─nvme0n1p3               259:3    0 462.7G  0 part
  └─ubuntu--vg-ubuntu--lv 253:0    0 462.7G  0 lvm  /
Copy the ISO to the USB using the dd command.
# ensure the USB is not mounted.
sudo umount /dev/sda /dev/sda1

# NOTE: If you skipped the above steps, consider using the $ORIG_ISO variable instead.
sudo dd bs=4M if=../$MODDED_ISO of=/dev/sda conv=fdatasync status=progress
Output:
351+1 records in
351+1 records out
1474353152 bytes (1.5 GB, 1.4 GiB) copied, 20.6316 s, 71.5 MB/s
The hard part of creating the bootable ISO is over. Next, let’s create a volume to host our cloud-init user-data configuration.
Create a USB named CIDATA for a cloud-init datasource
Warning
It’s important that the USB is named “CIDATA” and that it’s FAT32 formatted. If either of those is not met, the installation proceeds but has no custom config.
First, unplug the ISO from earlier and plug in a new, second, USB.
Format the disk.
# ensure the NEW USB is not mounted
sudo umount /dev/sda

# format using the FAT32 (`-F 32`) format and name (`-n`) the volume 'CIDATA' (`-I` for ignoring safety checks)
sudo mkfs.vfat -I -F 32 -n 'CIDATA' /dev/sda
Validate the label name worked with the following command. The /dev/disk/by-label/ directory contains all mounted USB volumes by their associated names.
# copied as-is
ls /dev/disk/by-label/
Output:
CIDATA 'Ubuntu-Server\x2022.04.1\x20LTS\x20amd64'
Mount the new USB to the /tmp/cidata directory for file creation.
mkdir /tmp/cidata
sudo mount /dev/sda /tmp/cidata
Create the meta-data file on CIDATA
cd /tmp/cidata
touch meta-data
Warning
cloud-init doesn’t work if the meta-data file is absent. Even an empty file meets the requirement.
Create the user-data file on CIDATA
When creating a user-data file it’s important to understand what parameters are available to you. The official docs have an awesome example file that shows off most features.
The autoinstall quickstart docs share the following example as a “minimal” autoinstall (cloud-init) config.
Sample user-data file
cat <<'EOF' > user-data
#cloud-config
autoinstall:
  version: 1
  identity:
    hostname: ubuntu-server
    username: ubuntu
    # "ubuntu" - created with `docker run -it --rm alpine mkpasswd --method=SHA-512`
    password: "$5$r3Kl6AKBqjA78VCX$4.Vuc56PR2faX3vLuqBxHxF796qiLhxuS4MacXtTt5C"
EOF
Feel free to use the above for testing.
My exact user-data file
Warning, the following file installs my public keys as authorized users on the target device. If you use my exact config, you won’t be able to log in.
# curl the file directly to a file named user-data in cidata
curl -fsSL https://gist.githubusercontent.com/jimangel/72a4d140e7fbde1b7e7fd64f286a17e8/raw/52b67667acbbb879b20a8b4e22ef4989fb1f22c5/user-data -o user-data
Insert both USBs and boot
Assuming everything is configured properly, we’re basically done at this point. But there are a couple of things to look out for.
Select the live-server USB as a boot option (optional)
If your BIOS isn’t configured to automatically boot from a USB device, configure the “boot options” menu. The live-server USB drive name might not be obvious, in my case it was UEFI: USB, Partition 2.
Override the live-server boot menu options (optional)
Warning
This step is optional. Skip this step if you are using a modified ISO.
Not to be confused with the USB being selected as the media to boot from, we now need to choose how Ubuntu launches from the USB. If you didn’t configure a custom ISO to auto-boot and autoinstall, you’ll need to enter a few parameters when prompted to select your Ubuntu boot option.
- Ensure the “Try or Install Ubuntu Server” option is highlighted using the up or down arrows.
- Press
eto edit the grub commands (launches a new screen) - Using the arrow keys, insert
autoinstall quietin the line that sayslinux /casper/vmlinuz ---before the dashes resulting in the full line appearing as:linux /casper/vmlinuz autoinstall quiet --- - Press
F10to save and exit
If you run into any issues, check out the log files in
/var/log/installeror/var/crash. Most of the time my issues were formatting or not escaping characters properly in the user-data file.
Complete! 🎉🎉🎉
The installation takes around 15-30 minutes depending on your internet speed and use of cloud-init. Test your access with ssh ubuntu@[IPADDR].
I enjoy keeping cloud-init limited to the OS setup and using configuration management tools like Ansible for server config. However, I do think it would be cool to explore the possibilities of using cloud-init to create specific “flavors” of fully configured bootable Ubuntu hosts.
For example, I could have a cloud-init setup for Kubernetes control plane hosts and another setup for Kubernetes workers. I need to think about it more, but it might be possible to have things boot and auto-join the cluster.
Lastly, I could create pre-configured images based on the Ubuntu OS pre-reqs for rapid build/rebuilding tests of Anthos clusters on bare metal.
Let me know if you do anything cool with this info!
Bonus: Alternative cloud-init datasources
I feel like there’s room for improvement with my solution. I came across a few alternative datasources that might help some other folks out along the way of finding their own improvements.
Create an ISO volume instead of a USB
If you’re interested in trying my solution on VMware, you could create an ISO from the two files instead of the formatted USB with one command: genisoimage -output seed.iso -volid cidata -joliet -rock user-data meta-data. genisoimage creates a file named seed.iso with the volume-id of cidata containing the two configuration files – ready for mounting.
Use a HTTP server as the datasource
To use a HTTP server as a datasource you could host a user-data file at http://192.168.1.100/user-data and an empty meta-data file at http://192.168.1.100/meta-data. To direct cloud-init to use that datasource, enter the following string in your grub boot config (/boot/grub/grub.cfg):
# Source modified from: https://discourse.ubuntu.com/t/cloud-init-and-the-live-server-installer/14597
menuentry "Try or Install Ubuntu Server" {
       set gfxpayload=keep
       linux   /casper/vmlinuz autoinstall quiet ds=nocloud-net\;s=http://192.168.1.100/ ---
       initrd  /casper/initrd
}
I think it would be cool to test out publically hosting those files, like a Netlify static website, GitHub pages, or Cloud Run. You could even have subdomains to split user-data configs like
https://golden-config.example.com/user-dataandhttps://just-for-hacks.example.com/user-data. Just try to be careful about what data is included in the user-data file 😜The official quick start guide has a basic http server example using python.
Bonus: Real-life homelab demo
This post covered a lot of ground, and I think that leads to things appearing more complex than they are.
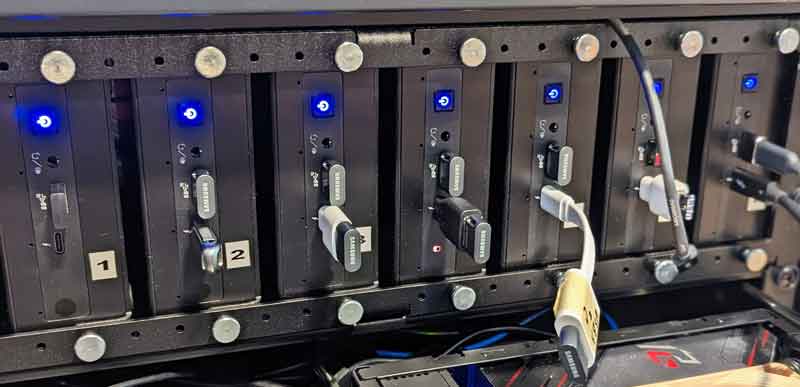
Sometimes, these topics can get noisy, and you might wonder what the actual process looks like. Here’s what my server automation process – looks like managing 7 servers – today.

Modifying the liver-server ISO
wget "https://releases.ubuntu.com/22.04/ubuntu-22.04.1-live-server-amd64.iso"
export ORIG_ISO="ubuntu-22.04.1-live-server-amd64.iso"
rm -rf mnt && mkdir mnt && mount -o loop $ORIG_ISO mnt
cp --no-preserve=all mnt/boot/grub/grub.cfg /tmp/grub.cfg
sed -i 's/linux	\/casper\/vmlinuz  ---/linux	\/casper\/vmlinuz autoinstall quiet ---/g' /tmp/grub.cfg
sed -i 's/timeout=30/timeout=1/g' /tmp/grub.cfg
export MODDED_ISO="${ORIG_ISO::-4}-modded.iso"
livefs-edit $ORIG_ISO $MODDED_ISO --cp /tmp/grub.cfg new/iso/boot/grub/grub.cfg
Copying the ISO to all USBs
The following command looks long and ugly because of the disk names. I felt like using the /by-id/ was safer.
# copy USBs (takes 30 seconds) - tip: `ls /dev/disk/by-id/ | grep '0:0$'` for names - used read/write speed to guess BS
dd bs=1M if=$MODDED_ISO iflag=fullblock | tee >(dd bs=1M iflag=fullblock oflag=direct of=/dev/disk/by-id/usb-Samsung_Flash_Drive_FIT_0329022060003582-0:0) >(dd bs=1M iflag=fullblock oflag=direct of=/dev/disk/by-id/usb-Samsung_Flash_Drive_FIT_0361222060003162-0:0) >(dd bs=1M iflag=fullblock oflag=direct of=/dev/disk/by-id/usb-Samsung_Flash_Drive_FIT_0373422060007246-0:0) >(dd bs=1M iflag=fullblock oflag=direct of=/dev/disk/by-id/usb-Samsung_Flash_Drive_FIT_0374622050002220-0:0) >(dd bs=1M iflag=fullblock oflag=direct of=/dev/disk/by-id/usb-Samsung_Flash_Drive_FIT_0374722050002291-0:0) >(dd bs=1M iflag=fullblock oflag=direct of=/dev/disk/by-id/usb-Samsung_Flash_Drive_FIT_0374822050002193-0:0) | dd bs=1M iflag=fullblock oflag=direct of=/dev/disk/by-id/usb-Samsung_Flash_Drive_FIT_0375022050002144-0:0
Copying the cloud-init data to all usbs
After swapping with the other set of USBs.
# change USBs for user-data & create cidata drives, create one-by-one:
mkdir /tmp/cidata
for i in /dev/sda /dev/sdb /dev/sdc /dev/sdd /dev/sde /dev/sdf /dev/sdg; do \
partprobe $i && umount $i || \
mkfs.vfat -I -F 32 -n 'CIDATA' $i && \
mount $i /tmp/cidata && touch /tmp/cidata/meta-data && \
curl -fsSL https://gist.githubusercontent.com/jimangel/72a4d140e7fbde1b7e7fd64f286a17e8/raw/52b67667acbbb879b20a8b4e22ef4989fb1f22c5/user-data \
-o /tmp/cidata/user-data && umount /tmp/cidata; done
Now, I’m ready to wipe / rebuild each host, it should take me less than 20 minutes to do all 7. Once complete, I have some housekeeping on my local laptop / ansible.
- Boot from the USB (wait for cloud-init to trigger autoinstall)
- After it shuts off, unplug the USB
- Boot again (wait for the second cloud-init to trigger host first-run provisioning)
- After it shuts off, provisioning is complete
- Boot for the last time
Clean up my local machine’s known_hosts
for i in $(echo "192.168.65.11 192.168.80.38 192.168.126.60 192.168.74.115 192.168.68.65 192.168.93.163 192.168.127.21"); do ssh-keygen -R $i && ssh-keyscan -H $i >> ~/.ssh/known_hosts; done
Check Ansible connections
The Ansible commands are run in a directory that already contained an inventory file that provided my username (
ansible_user: jangel) and other SSH parameters (ansible_connection: ssh).
ansible all -m ping
Confirm install success based on stats
# OS version
ansible all -m shell -a 'cat /etc/os-release | grep -i version='

# creation date
ansible all -m shell -a "stat / | awk '/Birth: /{print $2}'"

# bonus stats
ansible all -m setup -a 'filter=ansible_distribution,ansible_distribution_version,ansible_memfree_mb,ansible_memtotal_mb,ansible_processor_cores*,ansible_architecture' 2>/dev/null
At this point, I’ll run upgrade scripts to update the systems via Ansible. 😎