
I’m a big fan of the Home Assistant platform for my smart home needs.
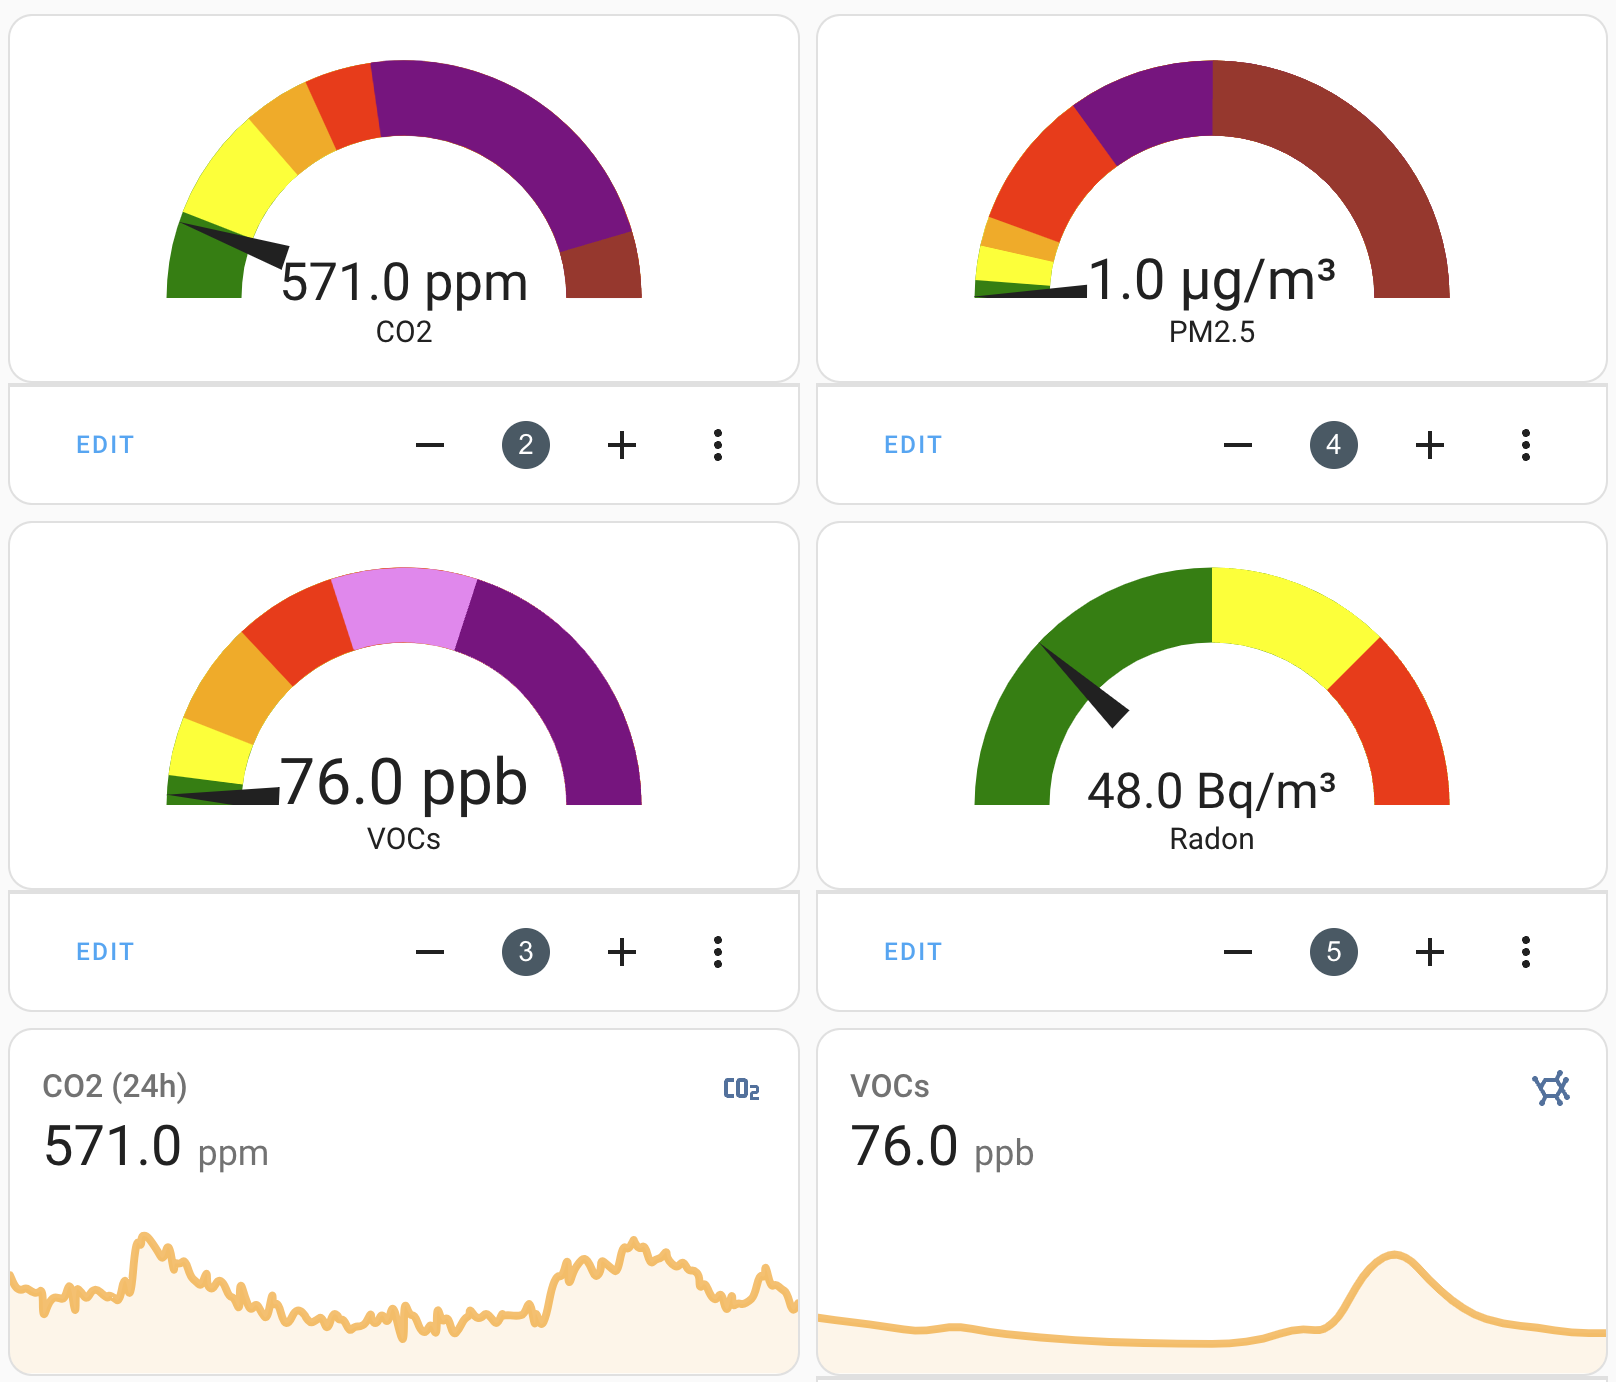
Recently, I started to look into air quality & room temperature monitors. My main goal was to create a dashboard with “at a glance” gas gauges and 24 hour trends, similar to:
I wasn’t able to find a ton of information on the topic and knew that I wanted to put sensors in multiple rooms, so I bought different ones and compared them. These are 100% my own views / non-sponsored. Also, I’m not rating these devices based on lab level accuracy - I hope they’re all semi-accurate - but I’m doing this for fun.
Let’s start with a high-level comparison and then discuss what exactly is being measured.
tl;dr: Airthings was my favorite due to how easy it was to integrate with Home Assistant and the features it has. However, it’s the most expensive.
Comparison
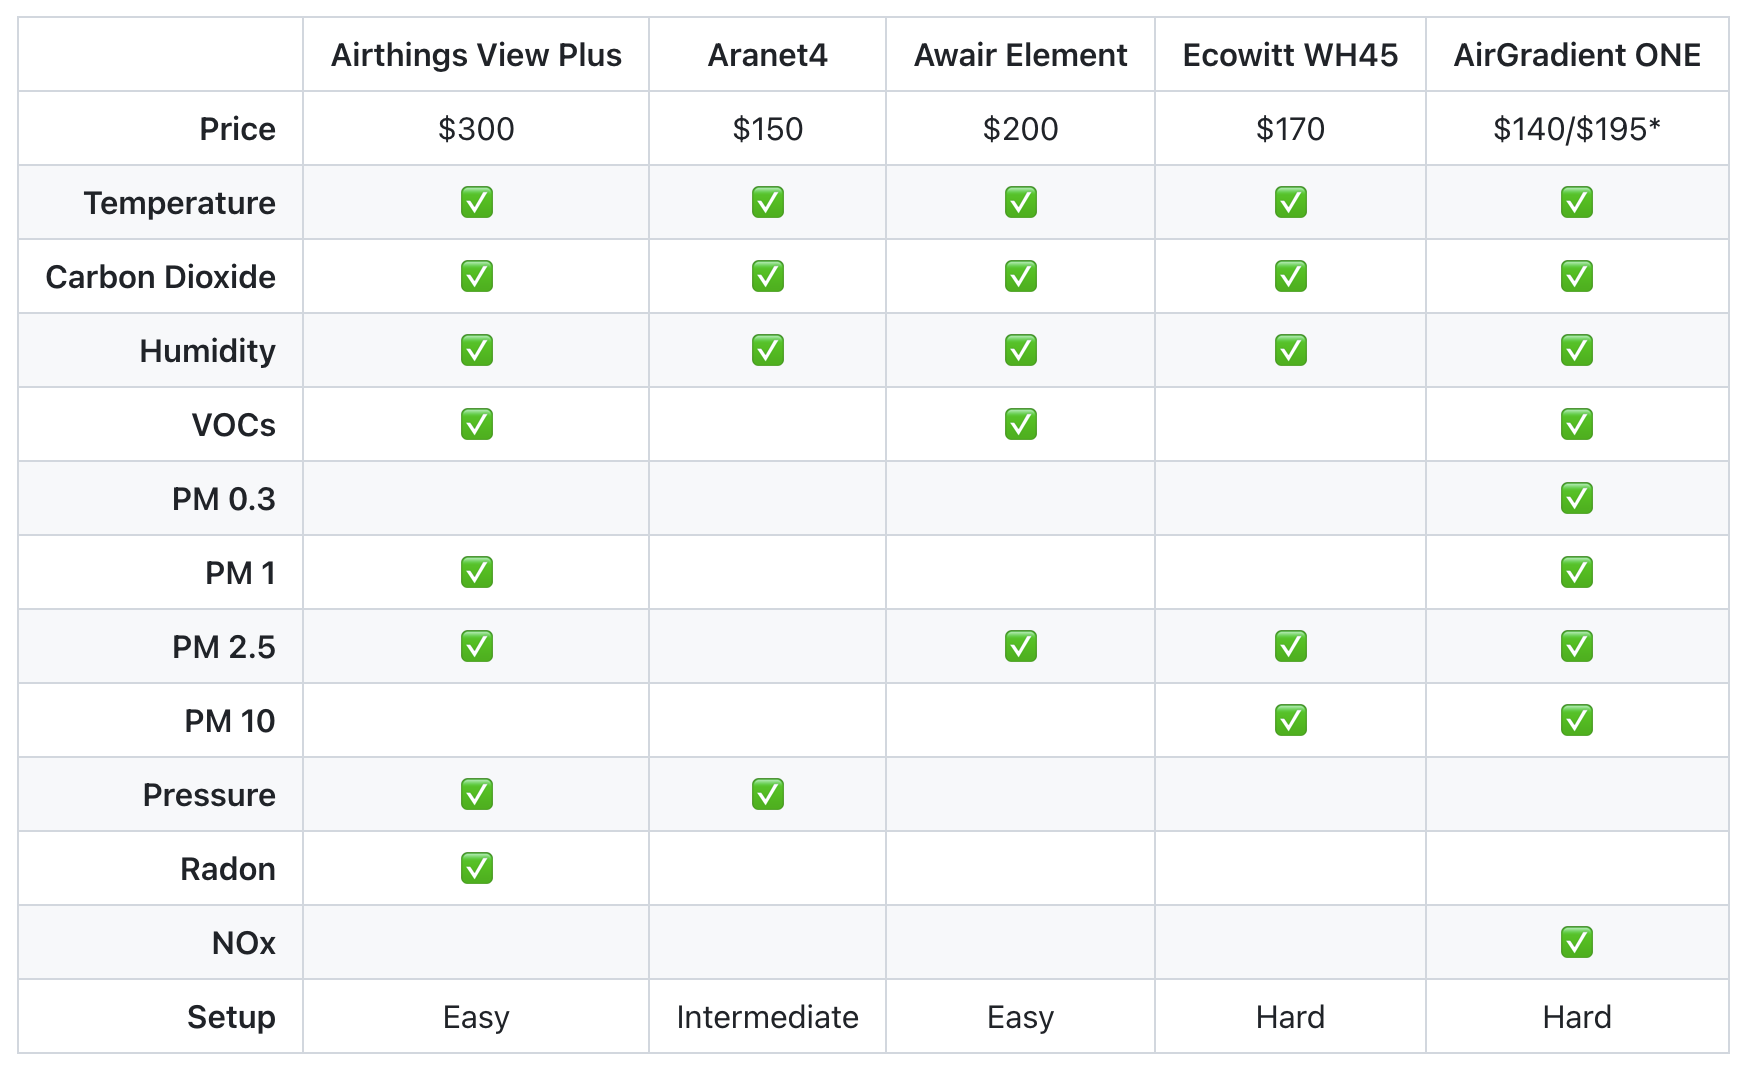
* AirGradient ONE has different price options for a DIY kit vs. Assembled
Terms to know
I had no clue what some of these sensors did beyond CO2 / Temp. Here’s some things I learned.
VOCs
Volatile organic compounds, or VOCs, are gases that are emitted into the air typically from pollution, smoke, fire, stoves. Most sensors output data in PPB (parts per billion).
Assigning a risk or recommended range to VOCs is challenging since the “situation is highly dependent on how they are measured. All available measurement methods are selective in what they can measure and quantify accurately, and none are capable of measuring all VOCs that are present.
This is why any statement about VOCs that are present in a given environment needs to be accompanied by a description of how the VOCs were measured so that the results can be interpreted correctly by a professional.” (source)
Yet, you still find general guidance online of “good” and “bad” levels of VOCs; take with a grain of salt.
Particulate Matter (PM)
Particulate Matter (PM) measurements are categorized by the diameter of the particles in micrometers (µm), the air monitor sensors usually output a value in micrograms per cubic meter (µg/m³).
It’s challenging to convert this value into a PPM/PPB value because the specific type of particulate is unknown and the conversion depends on the molecular weight of the substance.
The most commonly used PM measurement is 2.5 and 10. For context, a human hair is about 50-70 µm.
-
PM 1
- Encompasses particles with a diameter of up to 1 µm
- Examples: dust, combustion particles, bacteria and viruses
- No defined acceptable range due to size
-
PM 2.5
- These particles have a diameter of 2.5 µm or less
- Examples: wood/coal fires, cooking fumes and candles
- Acceptable range: less than or equal to 10.0 µg/m³ (source)
-
PM 10
- Includes particles with a diameter of 10 µm or less
- Often comprised of dust, pollen, and mold spores
- Acceptable range: less than or equal to 150 µg/m³ (source)
PM may be either directly emitted from sources (primary particles) or formed in the atmosphere through chemical reactions of gases (secondary particles) such as sulfur dioxide (SO2), nitrogen oxides (NOX), and certain organic compounds. (source)
Reviews and Home Assistant setup
Airthings View Plus
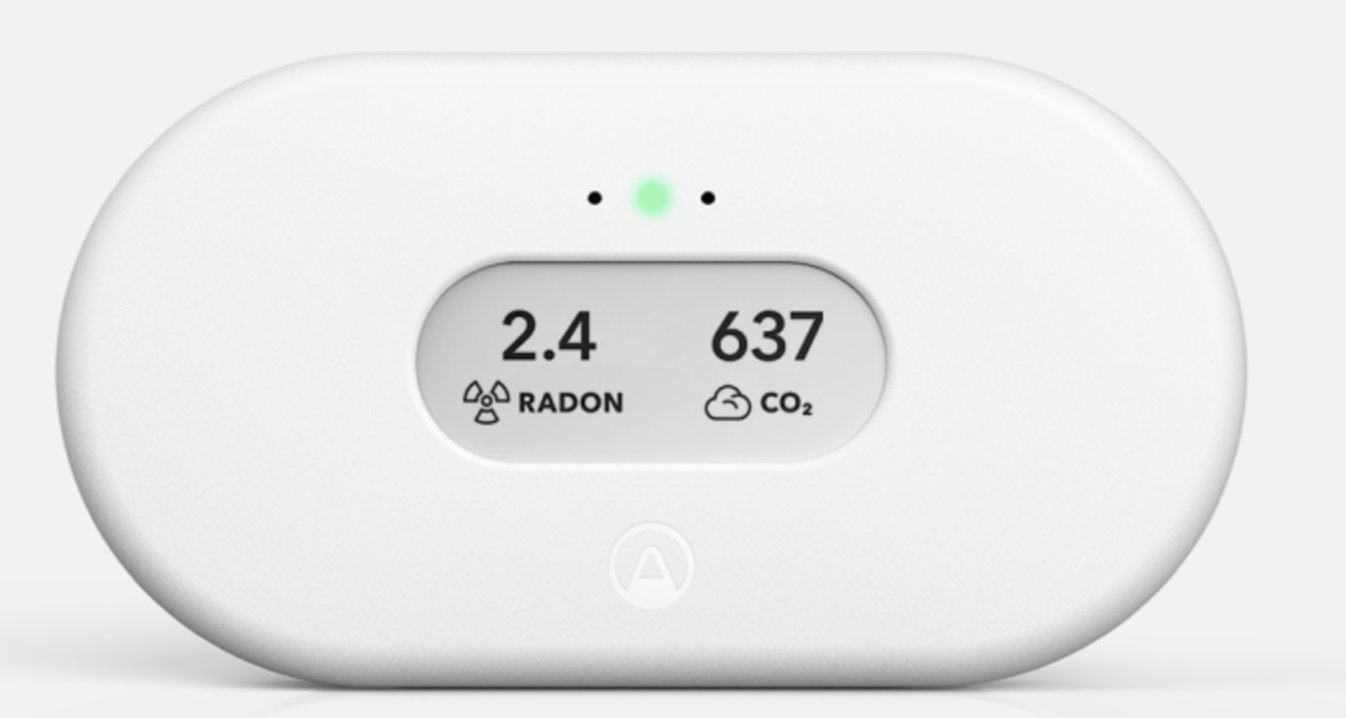
The View Plus was hands down the easiest setup. I installed the app, created an account, setup the device, and followed the Home Assistant integration setup. All the sensor data appeared in Home Assistant and I’ve had no known issues connecting data / retrieving data.
The Airthings integration requires using a Airthings hub to connect to their API; which is included in the View Plus device. This also means that your sensors can be expanded with smaller Wave Plus devices. (https://www.airthings.com/products)
- Pros
- It just works™
- Decent looking on shelf unit
- Easy to expand into multiple rooms (via Wave devices)
- Cons
- Price
- Integration is cloud dependent*
- Display options are limited
* There’s an Airthings BLE integration which allows for local offline / bluetooth capturing of data. However, it only supports the Wave series, not the View Plus.
Would I buy it again? Yes.
Aranet4
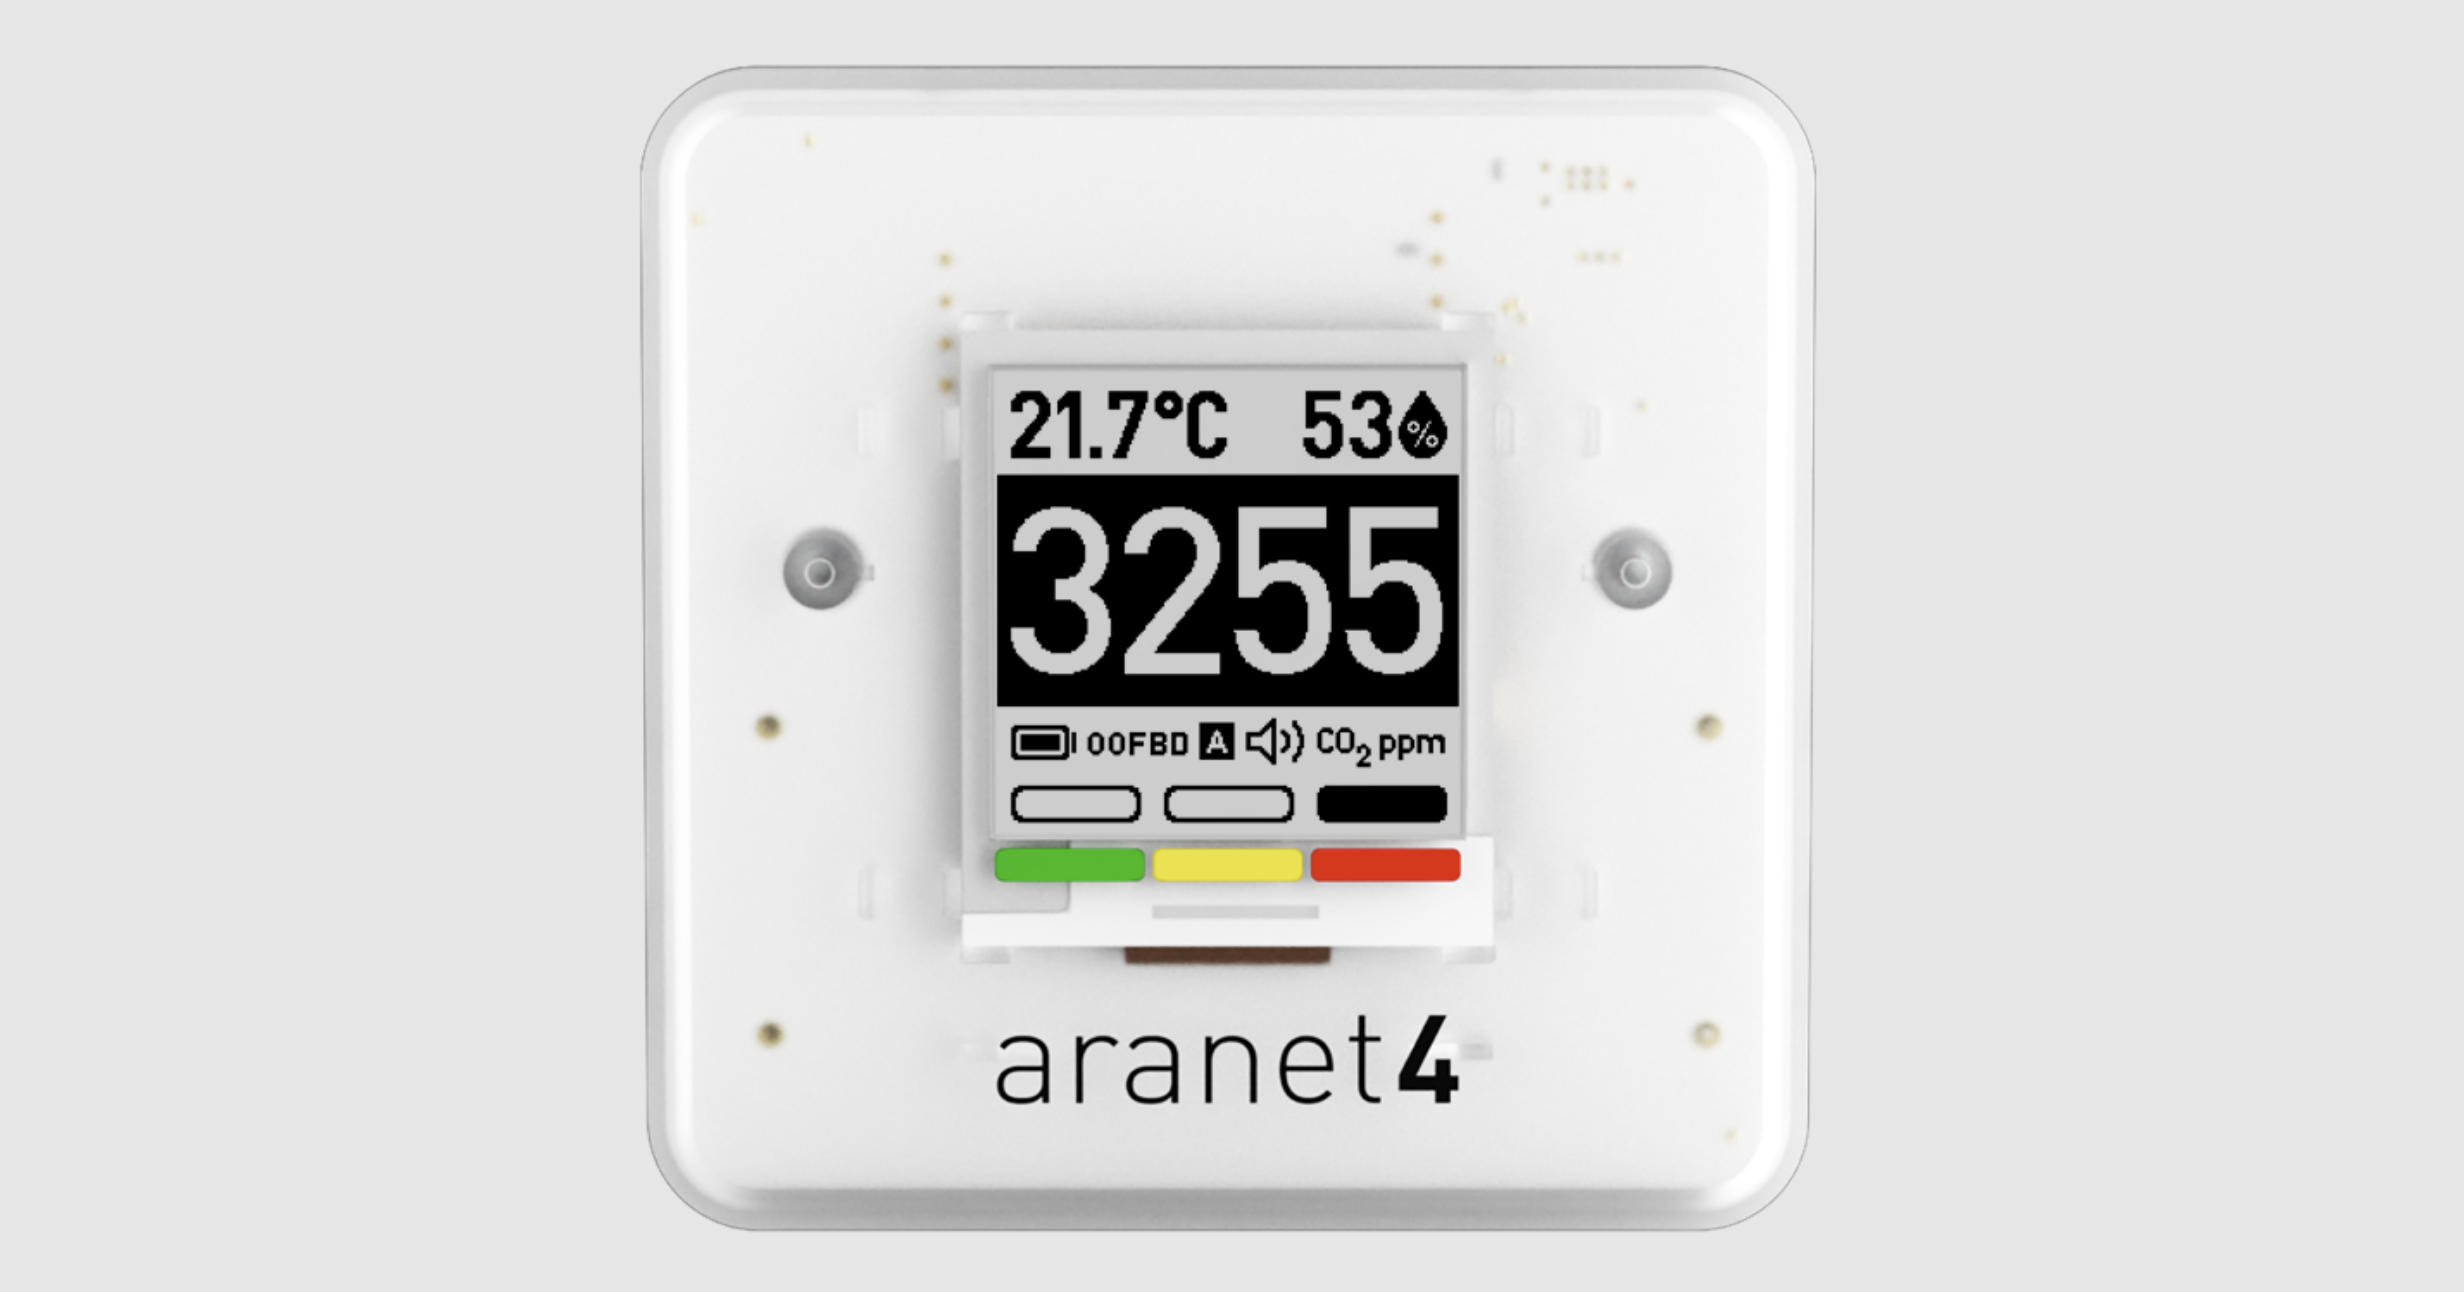
The Aranet4 is great due to its ease of use and portability. The biggest drawback is the lack of VOC/PM sensors that most other products have. I don’t think I would get this for home usage, but it would rock for portable settings if you were at a large conference or something.
To integrate with Home Assistant, I had to setup a way for my server to receive bluetooth data. After a brief search, I found a method using the ESPHome integration + a random ESP32 board from Amazon + ESPHome component for bluetooth proxy. This is gnarly because I can read my Aranet4 in my office using the ESP32 board as a proxy over my local network.
I think that’s a bit overkill for sensor data. For most folks that means you can’t use it with Home Assistant and you’re limited to the range of bluetooth.
- Pros
- Portable
- Local offline / bluetooth
- Long battery life
- No cables
- Cons
- Complex Home Assistant integration (BLE)
- Bluetooth range limitations
- lacks VOCs / PM sensors
Would I buy it again? Not for home, but would for travel.
Awair Element
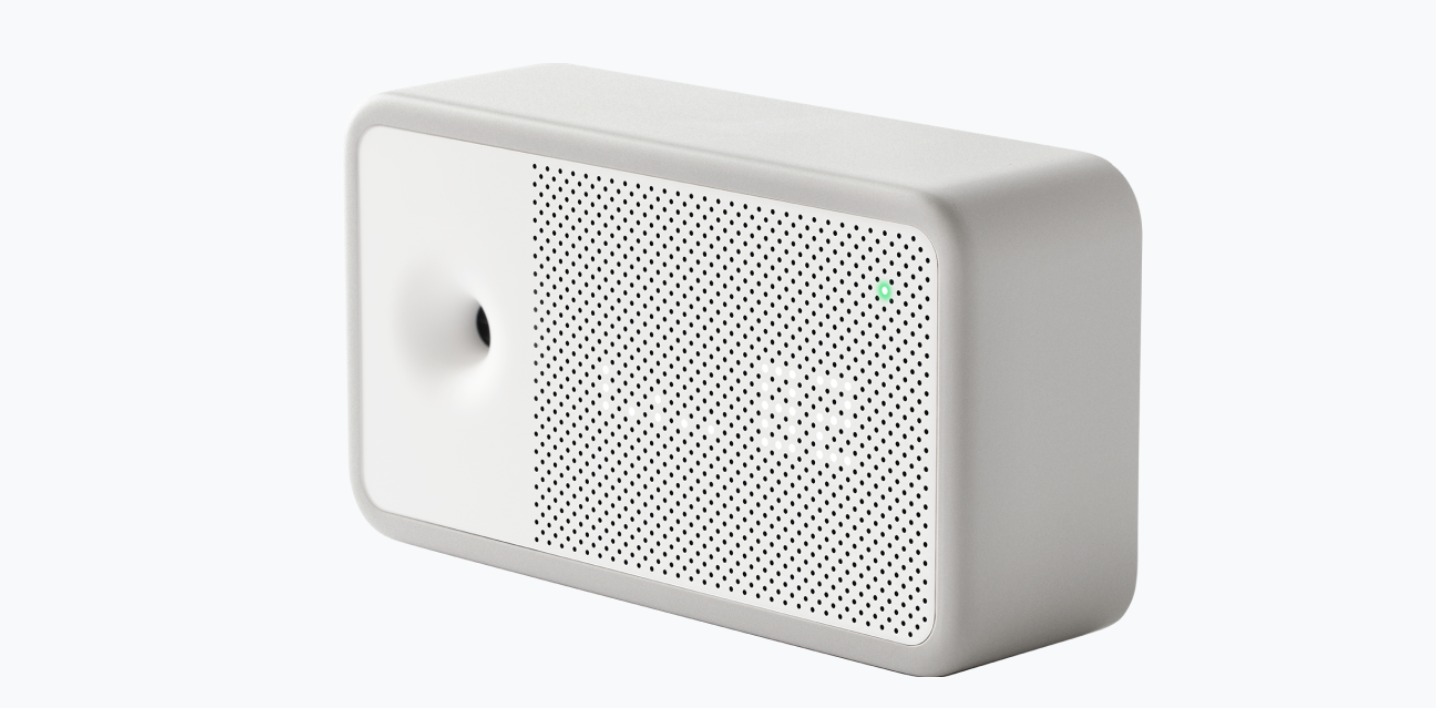
It’s possible that I would have liked this one more than the Airthings sensor - had I used it first. One huge perk, over the Airthings, is the ability to run locally or use the cloud. I wished it had a bit more sensors / data points - but, it is $100 less than the Airthings I’m comparing it to.
The integration setup in Home Assistant was easy and the same for setting up the device on my phone.
- Pros
- Choice of local / cloud integration
- Ease of setup & use
- Price to hassle ratio
- Cons
- Only measures temp, CO2, humidity, VOCs, and PM 2.5
- Display options are limited
Would I buy it again? Yes.
Ecowitt WH45
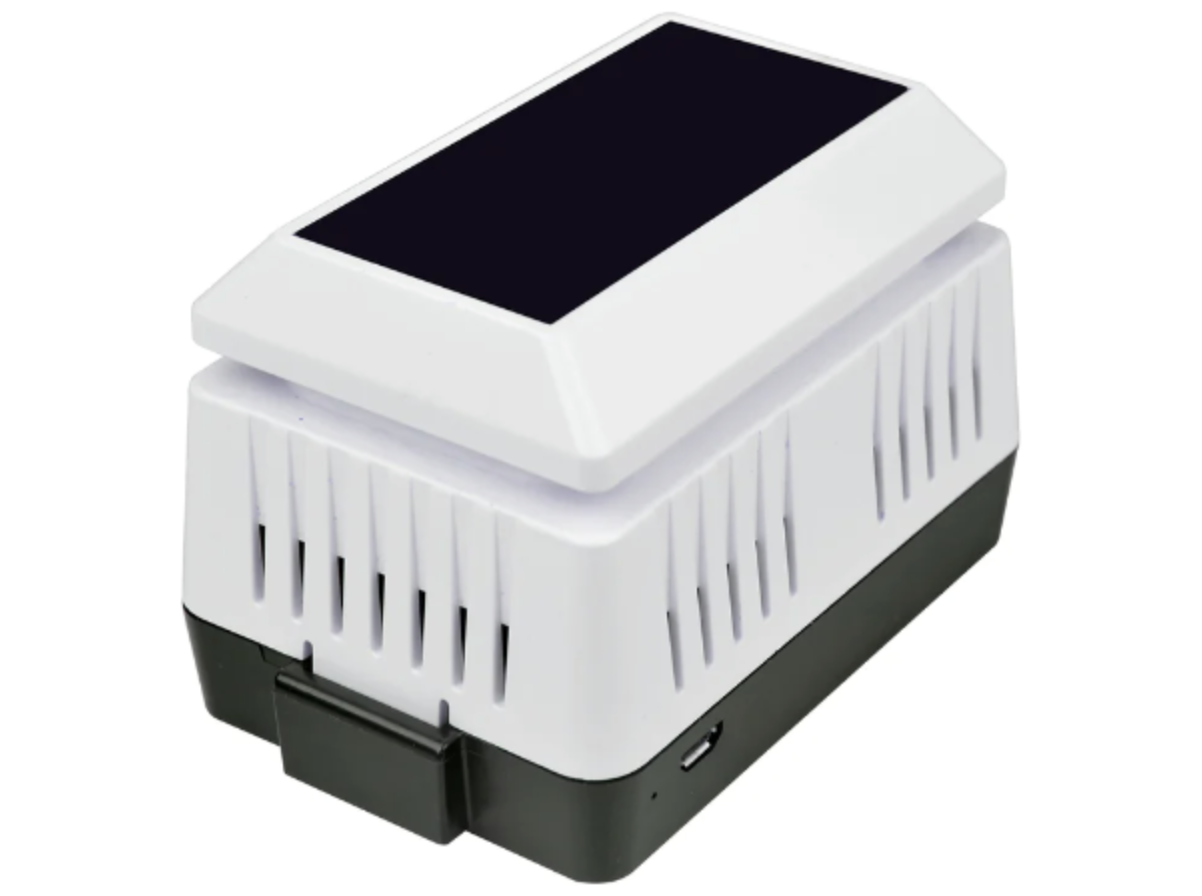
If you are looking at this option, ensure that you understand it requires a hub, such as a GW1100 or a GW2000. Since I was already testing a few Ecowitt sensors, this option seemed interesting.
While diving down this rabbit hole, I discovered that Ecowitt is a clone (?) of a brand called Fine Offset (https://www.foshk.com/). I don’t totally understand it, but it sounds like there’s a lot of copies of these types of weather stations.
Since I already had the gateway setup, adding the sensor wasn’t bad. I ran into issues configuring the supported core Ecowitt Home Assistant integration because of a small, hard to see, warning:
Ecowitt doesn’t support TLS/SSL
My Home Assistant server is only available via HTTPS and I don’t intend on changing that. I found this discussion, while looking for a solution, that talks about using a nginx reverse proxy to expose Home Assistant over HTTP and HTTPS (not ideal). This gave me the idea to run a HTTP to HTTPS reverse proxy to solve the problem without opening any non-HTTPS access to Home Assistant.
I outlined the solution here: https://gist.github.com/jimangel/77bd9393e0097e748005fb8ee44db6bf
Once up and running, I opened a pull request to make the install docs better for other HTTPS users.
- Pros
- PM 10
- Cons
- No VOCs
- Bad integration with Home Assistant
- Bad documentation
Would I buy it again? No.
AirGradient ONE
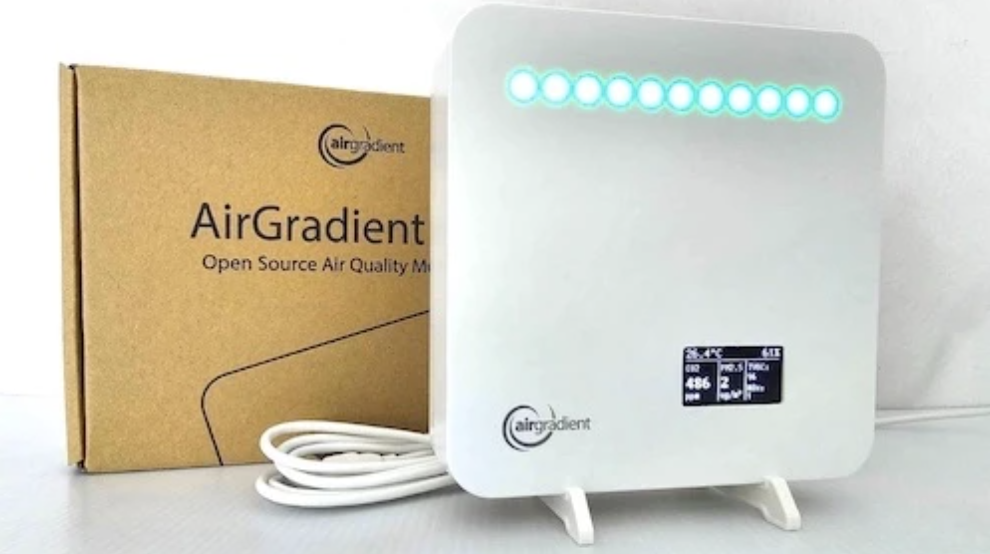
Note
(01/10/2025) Update: A direct integration with AirGradient & Home Assistant was released in June of 2024. (Integration Page)
It appears this integration is based on HTTP / Polling vs. Bluetooth and would resolve the bulk of my concerns with this platform.
When I started this journey, anything that required ESPHome was a deal breaker. I really wanted to avoid building my own air monitor from scratch (like seen here).
Ultimately, I ended up using ESPHome anyways for my Bluetooth Proxy and I thought I would give it a go. ESPHome is an open source project by Nabu Casa that allows easy programming of Espressif controller boards. It took me awhile to figure this out, but it comes down to: if you can connect to the board (USB or network), then ESPHome can push a config to it and get you up and running.
AirGradient offers a DIY method which instructs you how to build the units (for $60 or less), an AirGradient ONE “kit” for $138, or you can buy a preassembled AirGradient ONE for $195.
Since I had most of ESPHome running, all I needed to do was plug in the preassembled unit and push the documented config: https://devices.esphome.io/devices/AirGradient-One
- Pros
- Amount of data points / sensors
- Cost
- Offline
- Cons
- Hard to setup
- Display options are limited (and subjectively ugly)
- Size of device is larger than others
Would I buy it again? No, unless looking to save cost for the most data.
Dishonorable mention
As a big fan of Nest products, and I love the Google Nest Home Assistant integration, I was hoping to get room data from my Nest Temperature Sensors (the little white pucks).
It turns out that there isn’t a supported way to get the data.
I found some third party workarounds but I want to keep my setup as non-custom as possible.
Final thoughts
I learned a lot about air quality and found sensors that suit my needs. I really liked the Airthings and the concept of expanding rooms with the Wave line. However, the idea of not relying on cloud synchronization for my data also sounds good. Mainly from a data privacy standpoint and less dependencies.
I was reluctant to get into ESPHome but, after learning more about it, I think I would be willing to build my own DIY sensors. A quick search indicates they can be built for ~$60 or less. That’s a project for another day.
Now on to making sense of the data and setting up monitoring alerts.