Target audience: Kubernetes Operators, ML Engineers, GPU Nerds
Exploring the power of GPUs in the cloud sparked my interest in integrating a local NVIDIA GPU with my Kubernetes homelab cluster.
Adding a GPU to Kubernetes allows me to run Jupyter Notebooks and AI/ML workloads. The biggest benefit to this approach is portability; the same notebooks and models running locally are easily reproduced in the cloud.
This topic was confusing to me and I had to rely on information from various vendors, GitHub issues, and stack overflow posts.
I aim to demystify the process, offering a clear path to harnessing GPU acceleration for AI/ML workloads right from your own setup.
Scope
If you’re following along:
- You have a node running Ubuntu 22.04 LTS
- You have an NVIDIA GPU connected to the node
- Kubernetes installed and running
Unless otherwise stated, all commands should run on the above node.
Overview of components
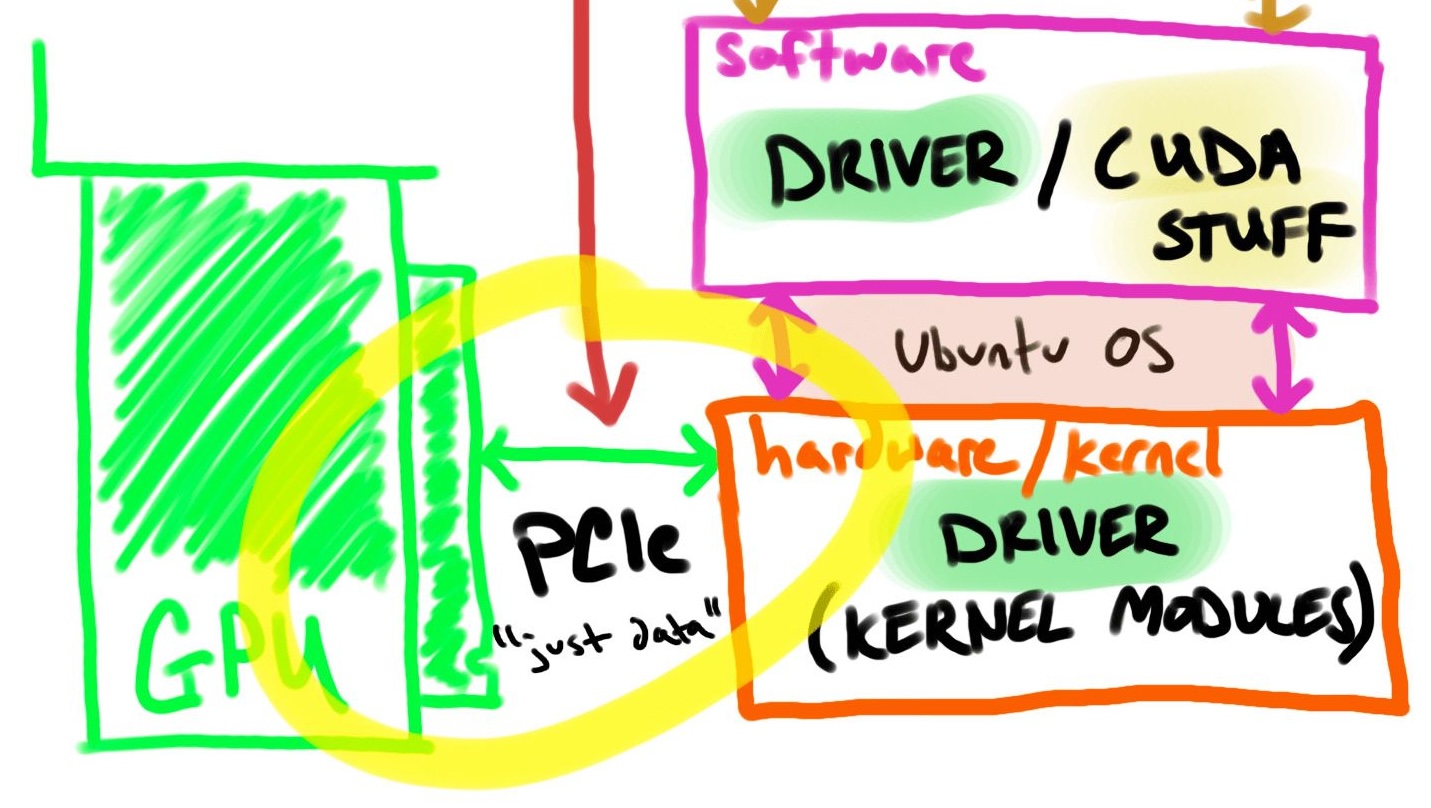
Let’s break each step of GPU connection path into larger components (pod/workload → kubernetes → container runtime → software → hardware → GPU).
I’ll cover each component from top to bottom, and then use the reverse order of “NEEDS” to set up and validate my GPU-accelerated Kubernetes homelab.
The diagram below visualizes the GPU connection path within a Kubernetes setup:
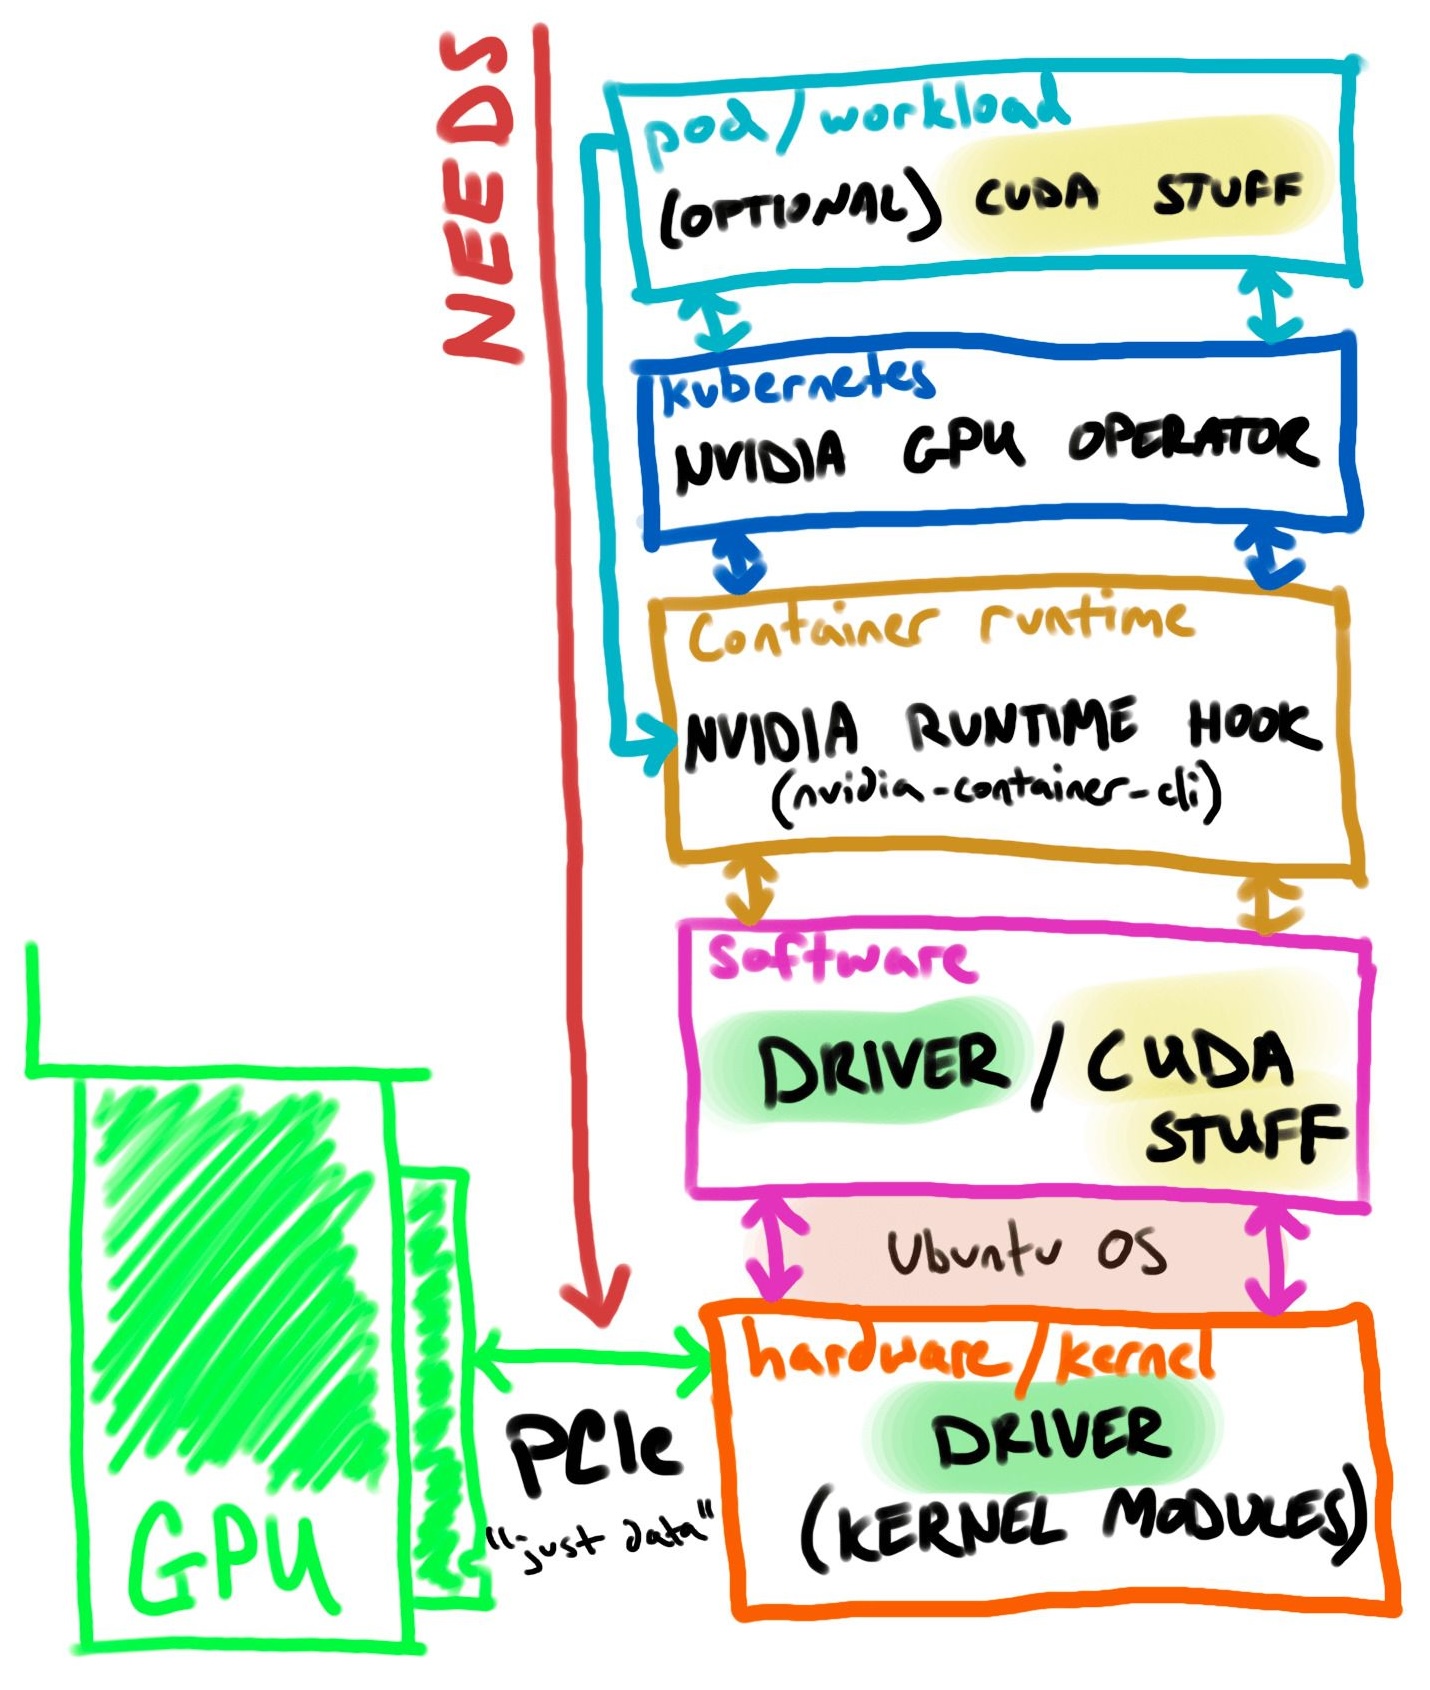
Starting with the pod/workload, the container should include software (like CUDA) to utilize GPU hardware. We can assume the container automatically gets a GPU with drivers but you still need to supply the SDK/API “on top.” The NVIDIA container runtime hook provides the container GPU device configuration.
How does Kubernetes know which pods need GPU(s)?
For my Kubernetes setup, I declare GPUs in the pod/workload via a combination of spec.runtimeClassName (runtime class docs), spec.containers.resources (resource quota docs), and spec.nodeSelector (nodeSelector docs). For example:
spec:
  runtimeClassName: nvidia   #<--- USE THE NVIDIA CONTAINER RUNTIME
  containers:
    resources:
      limits:
        nvidia.com/gpu: 1    #<-- ASSIGN 1 GPU, IF MULTIPLE
  nodeSelector:              #<--- RUN ON GPU ${NODE_NAME}
    kubernetes.io/hostname: ${NODE_NAME}
It’s also common to see NoSchedule taints on GPU nodes. This is to prevent workloads that don’t explicitly need GPUs from running (taints and toleration docs). To tolerate the NoSchedule taint:
spec:
  tolerations:
  - key: nvidia.com/gpu
    operator: Exists
    effect: NoSchedule
The YAML above samples instruct Kubernetes where / how to run the workload, however, GPUs are considered “extended resources” or “non-Kubernetes-built-in resources” (docs). There must be something that tells Kubernetes that there are X nodes with X GPUs available.
How does Kubernetes know which nodes have GPU(s)?
Many NVIDIA GPU features are auto-managed by the NVIDIA GPU Operator, including a device-plugin-daemonset deployment which informs Kubernetes about device capacity. (NVIDIA k8s-device-plugin docs)
The NVIDIA GPU Operator encompasses:
- The (optional) ability to install NVIDIA drivers on the host
- The Kubernetes device plugin for GPUs
- The (optional) ability to configure NVIDIA Container Runtime on the host
- Automatic node labeling
- DCGM (Data Center GPU Manager) based monitoring and more
The important part is that the operator automatically labels nodes for selectors and assesses capacity for quotas.
The NVIDIA device plugin is a Daemonset that allows you to automatically:
- Expose the number of GPUs on each node of your cluster
- Keep track of the health of your GPUs
- Run GPU-enabled containers in your Kubernetes cluster
Up to this point, our Kubernetes cluster has scheduled the workload to a GPU-ready node and provided instructions to the container runtime requesting the GPU accelerated nvidia runtimeClass.
How does the nvidia runtimeClass expose GPU(s)?
A package named NVIDIA Container Toolkit (docs) provides most of the configuration and binaries.
On the GPU node, the container runtime (containerd) is configured with a wrapper around runc called nvidia-container-runtime (docs).
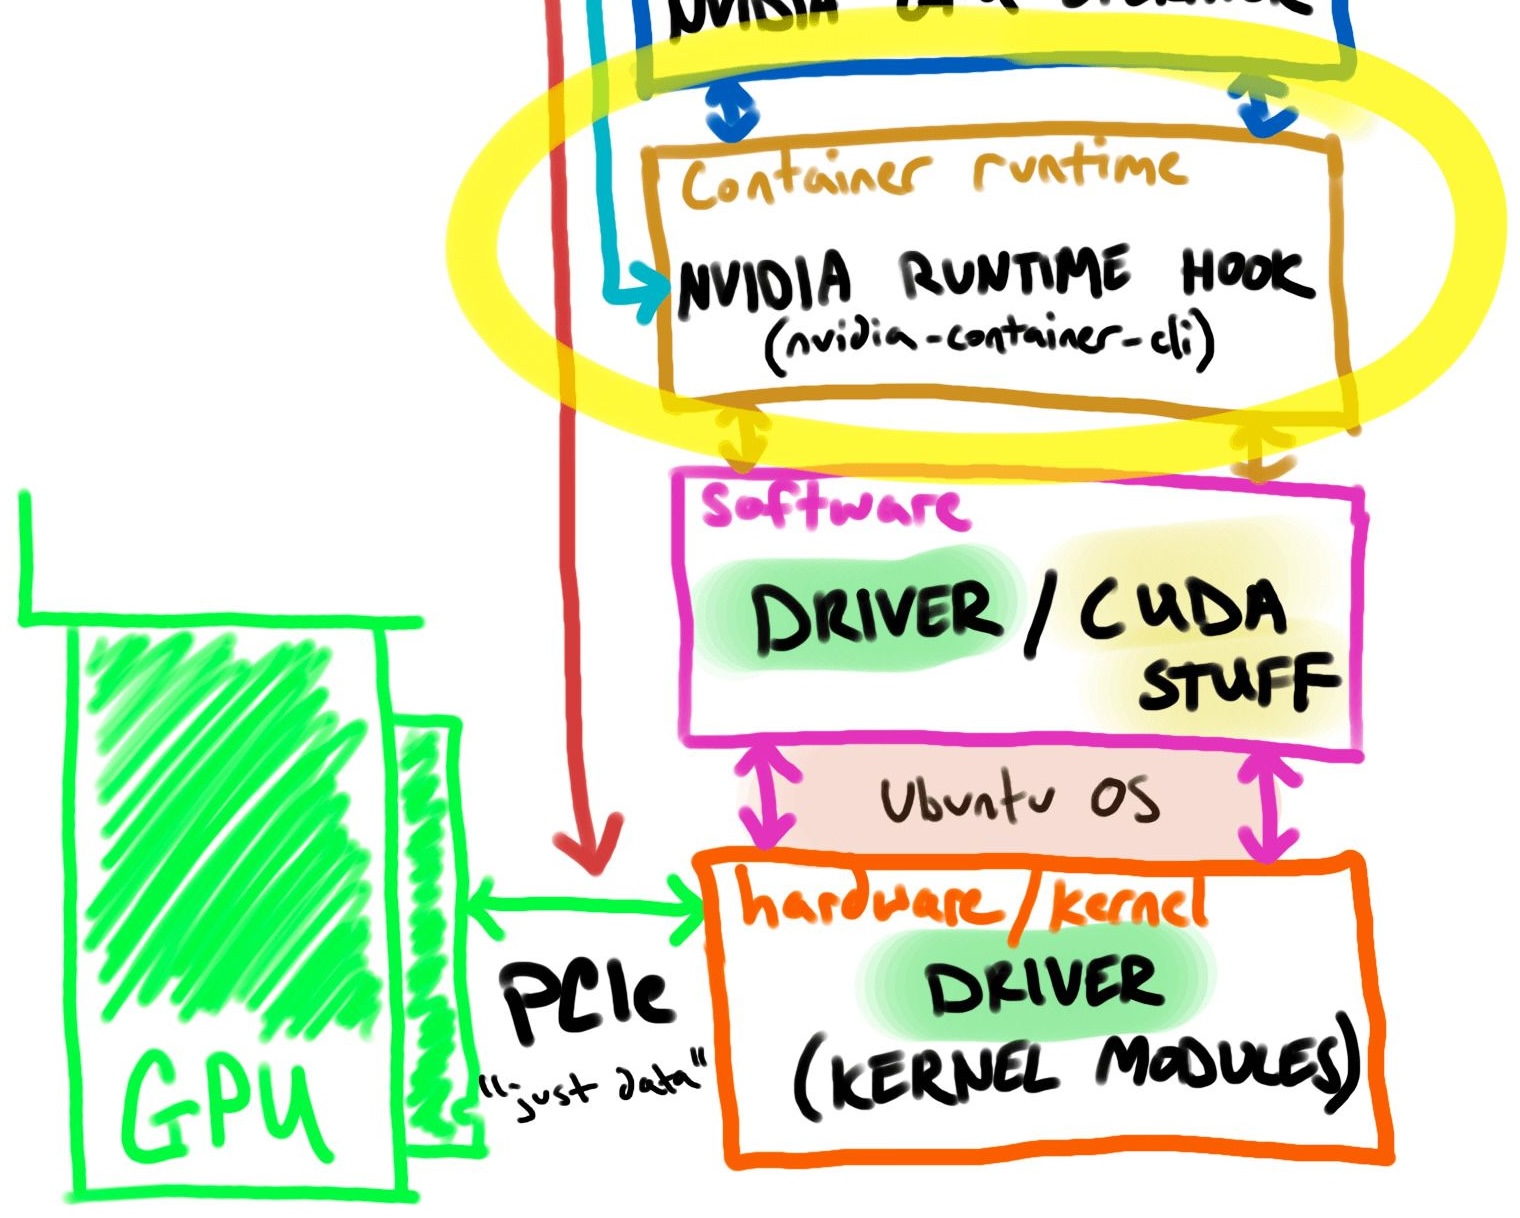
The wrapper (nvidia-container-runtime) uses a pre-start hook into containerd to add host GPUs via mounts, environment variables, etc.
Think of this like injecting the GPU hardware config into a container but you still need to bring the software (like CUDA)
Below is an example configuration for containerd to use the NVIDIA runtimeClass:
# /etc/containerd/config.toml
[plugins."io.containerd.grpc.v1.cri".containerd.runtimes]
  [plugins."io.containerd.grpc.v1.cri".containerd.runtimes.nvidia]
    privileged_without_host_devices = false
    runtime_engine = ""
    runtime_root = ""
    runtime_type = "io.containerd.runc.v2"
    [plugins."io.containerd.grpc.v1.cri".containerd.runtimes.nvidia.options]
      BinaryName = "/usr/bin/nvidia-container-runtime"
The above config is used anytime a container is using the nvidia runtimeClass.
Configuring /etc/containerd/config.toml is automated via nvidia-ctk (a poorly named subset utility of the nvidia-container-toolkit), covered later.
The nvidia-container-toolkit and utilities are responsible for configuring the container runtime, but that process assumes we already have a configured GPU on the host.
How does Ubuntu know it has a GPU?
The short answer is drivers. A driver is the essential software needed for your operating system to communicate with the NVIDIA graphics card.
The NVIDIA drivers are installed on Ubuntu using package managers.
There are 2 parts to the NVIDIA driver, how the hardware knows how to talk to the GPU (hardware/kernel modules) and how the software knows how to talk to the GPU.
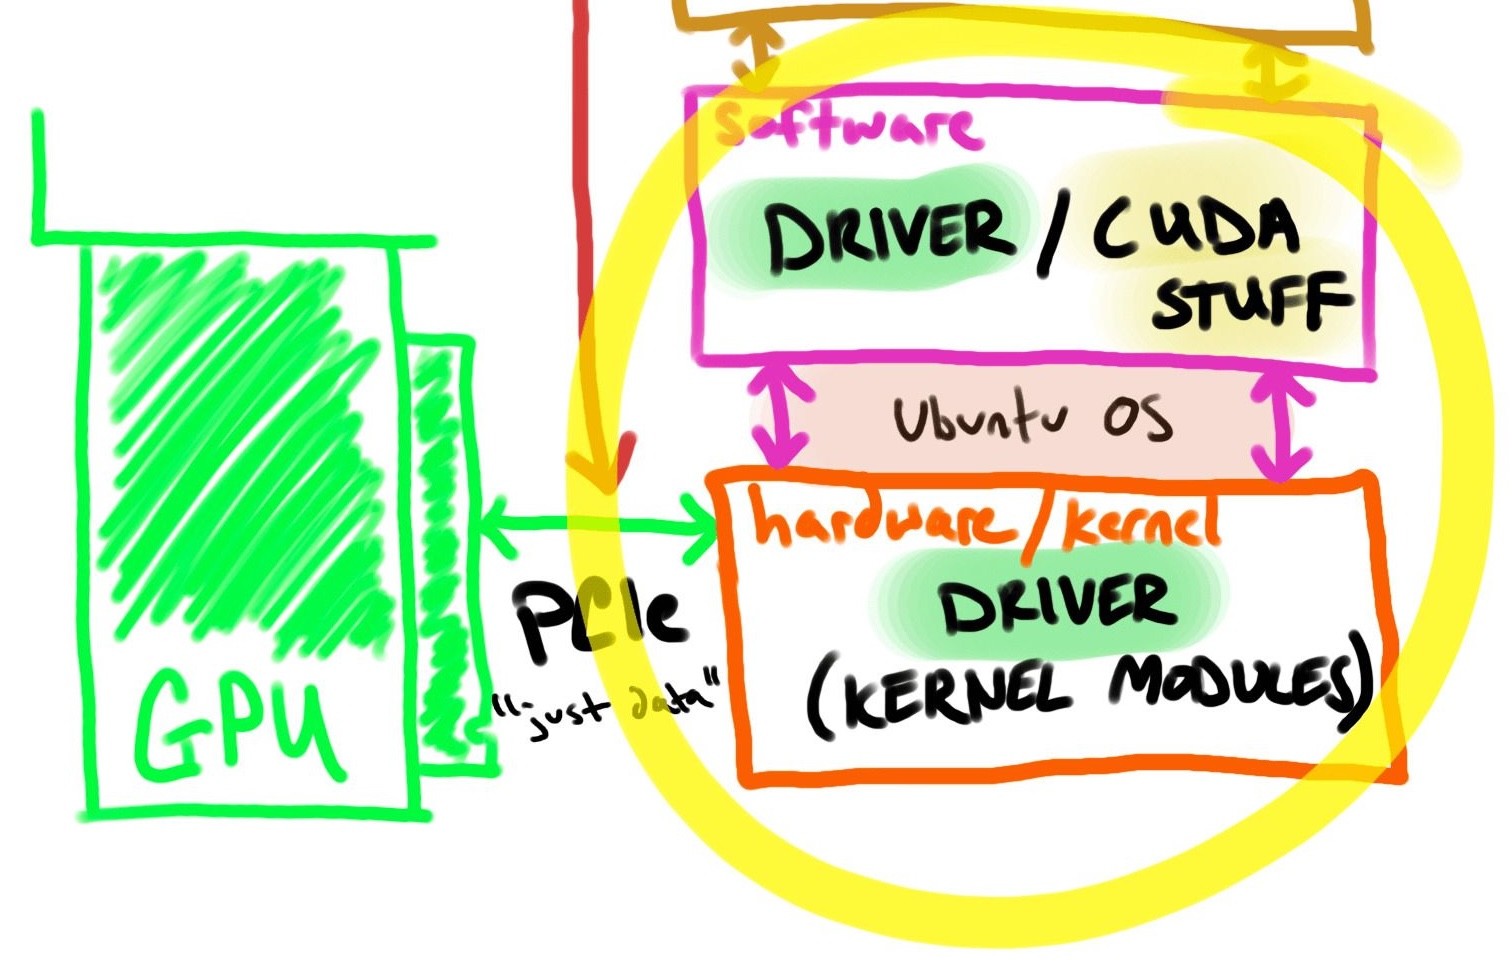
I included “CUDA stuff” in the picture because it could be installed on the host, but it depends on the exact use case. It is not required for this walkthrough and discussed later.
How does the motherboard know a GPU is connected?
This is a bit of a trick question. Most, if not all, consumer GPUs are connected via PCIe.
When I thought more about it, PCIe supports GPUs, NVMe, NICs, and many other peripherals. It’s just a way to transmit data.
The motherboard doesn’t need to know it’s a GPU, but it does need to know something is plugged into it via PCIe.
Note
If using a Thunderbolt external GPU (eGPU), it’s still considered PCI. “Thunderbolt combines PCIe and DisplayPort into two serial signals, and additionally provides DC power via a single cable.” (source)
Now that we’re at the bottom of the components, we can follow the reverse order to install & validate a GPU on a local Kubernetes cluster.
Configuring a NVIDIA RTX GPU on Kubernetes
Starting where we left off, let’s check the physical hardware connection.
Validate hardware connection
Use lspci, a utility for displaying information about PCI buses in the system and devices connected to them, to look for known NVIDIA device.
# list all PCI devices with the text NVIDIA
sudo lspci | grep NVIDIA
All good! ✅ Output:
2f:00.0 VGA compatible controller: NVIDIA Corporation GA106 [GeForce RTX 3060 Lite Hash Rate] (rev a1)
NVIDIA GPU driver considerations
Not only are there many competing ways to install the same GPU driver, but how do you know which version to use?
Finding the correct driver version
Use the search menu on NVIDIA’s driver download site to find the latest recommended version to install.
For example, searching for an RTX 3060 returns:
| Field | Value |
|---|---|
| Version | 535.154.05 |
| Release Date | 2024.1.16 |
| Operating System | Linux 64-bit |
| Language | English (US) |
| File Size | 325.86 MB |
That means I’m looking for the 535+ nvidia driver version.
(a side note about CUDA versions)
CUDA is additional software that helps applications run on NVIDIA GPUs. Consider it like an API for your host’s GPU.
While CUDA packages aren’t required for this setup, there’s a semi-delicate relationship between CUDA and driver version used in a container. If there’s a mismatch between CUDA and your driver, things may not work as expected!
Tip
After a driver is installed, nvidia-smi can be ran to check the recommended CUDA version, for example nvidia-driver-535 outputs CUDA 12.2 even though I haven’t installed CUDA.
Most of my problems went away once I had alignment with the CUDA version in the container alongside the matching host drivers. (CUDA download)
Also, fair warning, CUDA adds a significant amount of resources to your container images.
If you are determined to reduce the size of your image, you can selectively rm -rf the parts of the Toolkit that you don’t need, but be careful about not deleting libraries and tools that may be used by applications in the container!
Install the NVIDIA GPU driver
There are a few popular ways to install the NVIDIA GPU driver on Ubuntu 22.04 LTS:
- Official Ubuntu managed NVIDIA drivers via
ubuntu-drivers install(docs) - Official NVIDIA managed NVIDIA drivers via
.run file(download) - Unofficial PPA managed NVIDIA drivers via
ppa:graphics-drivers/ppa(docs)
For this walkthrough, I use the last option (ppa) but feel free to substitute in your preferred method. I chose PPA because it seemed to work the easiest.
Add the PPA repo and install the driver found above.
# add ppa:graphics-driver repo to apt
sudo add-apt-repository ppa:graphics-drivers/ppa --yes

# update apt content list
sudo apt update

# install driver
sudo apt install nvidia-driver-535
Warning
I ran into an issue where Ubuntu’s unattended-upgrades automatically updated some of the GPU driver dependencies and broke my GPU configuration.
Fixed with sudo apt remove unattended-upgrades but there are other, less forceful, solutions.
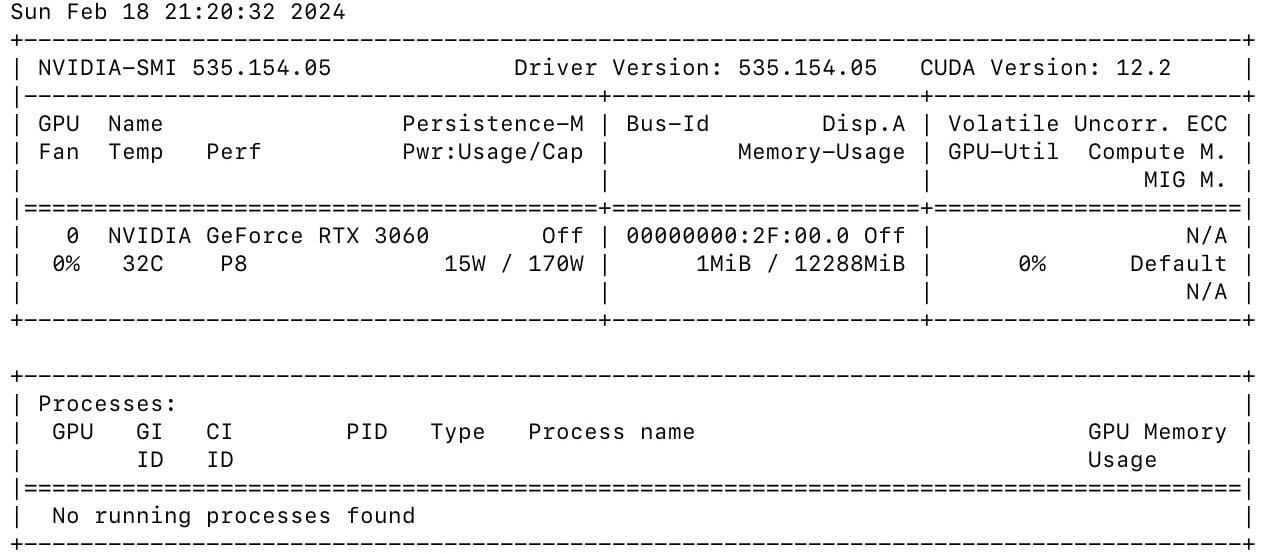
Now that we have the drivers installed, let’s validate they’re working. A quick test would be running nvidia-smi, a utility that provides monitoring and management capabilities for NVIDIA GPUs.
# get the driver version
nvidia-smi --query-gpu=driver_version --format=csv,noheader
Validate the NVIDIA GPU driver
Validate installation by listing all packages (dpkg -l) installed with “nvidia” or “535” in the name.
dpkg -l | grep nvidia
# or
dpkg -l | grep 535
# expected output: non-empty list of packages
All good! ✅
Tip
To prevent unplanned package changes, hold them to prevent auto-upgrading.
# any package with nvidia in the name should be held
dpkg-query -W --showformat='${Package} ${Status}\n' | \
grep -v deinstall | \
awk '{ print $1 }' | \
grep -E 'nvidia.*-[0-9]+$' | \
xargs -r -L 1 sudo apt-mark hold
Output:
#...
libnvidia-fbc1-535 set on hold.
libnvidia-gl-535 set on hold.
nvidia-compute-utils-535 set on hold.
nvidia-dkms-535 set on hold.
This also means sudo apt-mark unhold [package_name] must be ran before upgrading.
Are the kernel modules installed? Is the driver working?
Modules instruct the kernel how to interact with the device attached to it. Without any NVIDIA modules, the OS doesn’t know how to communicate with the hardware.
Use lsmod, a program which lists the contents of the /proc/modules, showing what kernel modules are currently loaded.
# Show the status of driver modules in the Linux Kernel
lsmod | grep nvidia
If you have modules installed it might look like ✅:
nvidia_uvm           1511424  12
nvidia_drm             77824  0
nvidia_modeset       1306624  1 nvidia_drm
nvidia              56692736  200 nvidia_uvm,nvidia_modeset
drm_kms_helper        311296  1 nvidia_drm
drm                   622592  4 drm_kms_helper,nvidia,nvidia_drm
Note
I was testing the above output with an eGPU and the modules weren’t showing up. I thought my understanding was wrong, but it turned out I didn’t plug in the cable.
Connecting the eGPU fixed my issue and the modules appeared.
Check the kernel driver version file:
cat /proc/driver/nvidia/version
All good! ✅ Output:
NVRM version: NVIDIA UNIX x86_64 Kernel Module  535.154.05  Thu Dec 28 15:37:48 UTC 2023
GCC version:  gcc version 11.4.0 (Ubuntu 11.4.0-1ubuntu1~22.04)
Check the device file for a found nvidia device:
# any device files (I/O sys calls)
ls /dev/ | grep 'nvidia[0-9]\+'
All good! ✅ Output:
nvidia0
It appears that we have a host with a working GPU setup, next let’s configure containerd to support a GPU runtime.
Install NVIDIA Container Toolkit
My homelab is running Kubernetes v1.28.4 with containerd. As mentioned earlier, we need the NVIDIA Container Toolkit (a set of utilities) to configure containerd to leverage NVIDIA GPU(s).
As far as I know, this installs tools on your host but does not configure, or change, anything by default.
From the “Installing the NVIDIA Container Toolkit” guide.
# add nvidia-container-toolkit repo to apt sources
curl -fsSL https://nvidia.github.io/libnvidia-container/gpgkey | sudo gpg --dearmor -o /usr/share/keyrings/nvidia-container-toolkit-keyring.gpg \
&& curl -s -L https://nvidia.github.io/libnvidia-container/stable/deb/nvidia-container-toolkit.list | \
sed 's#deb https://#deb [signed-by=/usr/share/keyrings/nvidia-container-toolkit-keyring.gpg] https://#g' | \
sudo tee /etc/apt/sources.list.d/nvidia-container-toolkit.list

# update apt content
sudo apt update

# install container toolkit
sudo apt install -y nvidia-container-toolkit
Note
As of the v1.12.0 release the NVIDIA Container Toolkit includes support for generating Container Device Interface (CDI) specifications - an alternative approach to this blog for adding GPUs to a container runtime.
https://docs.nvidia.com/datacenter/cloud-native/container-toolkit/latest/cdi-support.html
Configure containerd
Now that the tools are installed, we need to update the containerd config runtime classes. Luckily one of the tools, nvidia-ctk can automate that process.
From the “Installing the NVIDIA Container Toolkit” guide.
# options: --dry-run
sudo nvidia-ctk runtime configure --runtime=containerd

# restart containerd
sudo systemctl restart containerd
Verify that containerd is running with sudo systemctl status containerd
Note
You can customize the NVIDIA runtime configuration by specifying the runtime name (--nvidia-runtime-name), the path to the NVIDIA runtime executable (--nvidia-runtime-path), and the path to the NVIDIA Container Runtime hook executable (--nvidia-runtime-hook-path).
There’s also an option to set the NVIDIA runtime as the default runtime using --nvidia-set-as-default. (source)
If you want to dig more into what nvidia-container-runtime does on the host to expose a GPU, I highly recommend reading their low level example in the docs.
If you’re still not tired of this topic, the blog titled “Enabling GPUs in the Container Runtime Ecosystem” from NVIDIA is excellent.
Validate containerd
Check that the nvidia runtime exists in the config.
sudo cat /etc/containerd/config.toml | grep "containerd.runtimes.nvidia."
All good! ✅ Output:
[plugins."io.containerd.grpc.v1.cri".containerd.runtimes.nvidia]
  [plugins."io.containerd.grpc.v1.cri".containerd.runtimes.nvidia.options]
Let’s try to run a container directly on the host (skipping Kubernetes). First we need to Install nerdctl, a drop-in replacement for docker, that allows for us to use the --gpus all argument.
Install nerdctl using a precompiled release.
Note the version of CUDA I’m selecting, check out the repo website for the latest tag options: docker.com/r/nvidia/cuda/tags
# `nvidia-smi` command ran with cuda 12.3
sudo nerdctl run -it --rm --gpus all nvidia/cuda:12.3.1-base-ubuntu20.04 nvidia-smi

# `nvcc -V` command ran with cuda 12.3 (the "12.3.1-base" image doesn't include nvcc)
sudo nerdctl run -it --rm --gpus all nvidia/cuda:12.3.1-devel-ubuntu20.04 nvcc -V
All good! ✅
Note
If you are on a machine with multiple GPUs, you can substitute --gpus all with something like --gpus '"device=0,1"' to test sharing individual GPUs.
# only use device 0 and 1 out of a possible [0,1,2,3] setup
sudo nerdctl run -it --rm --gpus '"device=0,1"' nvidia/cuda:12.2.2-base-ubuntu22.04 nvidia-smi
At this spot, we have a GPU node that works up to the container runtime.
Install the NVIDIA GPU Operator using helm
The last piece of the puzzle, we need to let Kubernetes know that we have nodes with GPU’s on ’em.
The NVIIDA GPU Operator creates/configures/manages GPUs atop Kubernetes and is installed with via helm chart.
Install helm following the official instructions. If you’re interested in looking at the helm chart and values here’s the Github repo.
Add the helm repo:
helm repo add nvidia https://helm.ngc.nvidia.com/nvidia \
   && helm repo update
Install the release on your Kubernetes cluster.
By default, the Operator deploys the NVIDIA Container Toolkit and NVIDIA drivers as a container on the system. We’ll set these values to false since we already installed both components.
helm install --wait gpu-operator \
     -n gpu-operator --create-namespace \
      nvidia/gpu-operator \
      --set driver.enabled=false \
      --set toolkit.enabled=false
Ensure all the pods came up healthy:
# ensure nothing on kubernetes is wonky
kubectl get pods -n gpu-operator | grep -i nvidia
All good! ✅ Output:
nvidia-cuda-validator-4hh2v                                  0/1     Completed   0               3d20h
nvidia-dcgm-exporter-86wcv                                   1/1     Running     5 (7d10h ago)   7d20h
nvidia-device-plugin-daemonset-cxfnc                         1/1     Running     0               26h
nvidia-operator-validator-jhz6j                              1/1     Running     0               3d20h
Validate the GPU Operator
kubectl -n gpu-operator logs deployment/gpu-operator | grep GPU
This isn’t a foolproof test, but you should see Number of nodes with GPU label","NodeCount": NUMBER_OF_EXPECTED_GPU_NODES with an actual value. If it says 0, there’s probably an issue that requires debugging.
Helpful debugging command: kubectl get events -n gpu-operator --sort-by='.lastTimestamp'
Tip
When in doubt (or when the GPU operator pods are stuck in init / terminating on a single node but the underlying setup is sound): reboot the node.
Putting it all together
Finally, let’s run a Kubernetes workload to test that our integration works end to end.
# EXPORT NODE NAME!
export NODE_NAME=node3

cat <<EOF | kubectl create -f -
apiVersion: batch/v1
kind: Job
metadata:
  name: test-job-gpu
spec:
  template:
    spec:
      runtimeClassName: nvidia
      containers:
      - name: nvidia-test
        image: nvidia/cuda:12.0.0-base-ubuntu22.04
        command: ["nvidia-smi"]
        resources:
          limits:
            nvidia.com/gpu: 1
      nodeSelector:
        kubernetes.io/hostname: ${NODE_NAME}
      restartPolicy: Never
EOF
Check the output via logs:
kubectl logs job/test-job-gpu
Expected output similar to:
Congrats! 🎉🎉🎉 We officially have a local GPU accelerated Kubernetes cluster!
Conclusion
Integrating GPUs into Kubernetes might seem daunting due to the involved technical layers. I hope this guide demystifies the process of integrating NVIDIA GPUs with Kubernetes for you.
In summary, exposing a GPU on k8s includes:
- Install NVIDIA GPU drivers (
apt install nvidia-driver-535) - Configure container runtime (
apt install -y nvidia-container-toolkit&nvidia-ctk runtime configure) - Configure kubernetes (
helm install nvidia/gpu-operator) - Update deployment YAML to include GPU requests
In the future, I’d consider using the ubuntu-driver installer and/or having the Kubernetes GPU Operator manage the driver and container toolkit.
If you have any questions, insights, or feedback, feel free to share!
Clean up
Want to start over? Install a different driver? Delete everything:
# drain node / remove from cluster

# remove gpu-operator deployment
helm -n gpu-operator list
helm -n gpu-operator delete HELM_RELEASE_NAME

# delete driver packages
sudo apt remove --purge '^nvidia-.*'
sudo apt remove --purge '^libnvidia-.*'

# clean up the uninstall
sudo apt autoremove

# restart containerd
Bonus: Lazy GKE A100 exploration
I was curious how my current understanding of local NVIDIA GPUs compared to GPU acceleration in the cloud, so I spun up an A100 node on GKE.
I had to deploy the node twice because I made a mistake on my first deployment. I omitted gpu-driver-version=default; so a driver and tools weren’t found (as intended) but I could see the connected PCI device.
There are instructions on manually installing the driver on COS here, but I consider it out of scope.
Here is the command I used to (re)create the node pool:
# create command
gcloud container node-pools create gpu-pool-2 \
  --cluster cluster-2 \
  --region us-central1 \
  --machine-type a2-highgpu-1g \
  --num-nodes 1 \
  --accelerator type=nvidia-tesla-a100,count=1,gpu-driver-version=default
Let’s see what we can find!
# gcloud compute ssh NODE_NAME

# PCI connection?
sudo lspci | grep NVIDIA
00:04.0 3D controller: NVIDIA Corporation GA100 [A100 SXM4 40GB] (rev a1)

# Driver installed?
cat /proc/driver/nvidia/version
#NVRM version: NVIDIA UNIX x86_64 Kernel Module  470.223.02  Sat Oct  7 15:39:11 UTC 2023
#GCC version:  Selected multilib: .;@m64

# tab complete `nvidia-c*`
nvidia-container-runtime       nvidia-container-runtime.cdi
nvidia-container-runtime-hook  nvidia-ctk

# Where is nvidia-smi?
sudo find / -type f -name "nvidia-smi" 2>/dev/null
# /home/kubernetes/bin/nvidia/bin/nvidia-smi

# Runtime?
sudo cat /etc/containerd/config.toml | grep "containerd.runtimes.nvidia."

# NO!

# But, a quick look around:
# bin k8s container runtime is in the default + device plugin
# it looks like some things mounted via default runc runtime here, but idk
sudo cat /etc/containerd/config.toml  | grep bin
# OUTPUT
#  bin_dir = "/home/kubernetes/bin"

# ls /home/kubernetes/bin/nvidia/bin/
#nvidia-bug-report.sh     nvidia-debugdump  nvidia-ngx-updater   nvidia-sleep.sh   nvidia-xconfig
#nvidia-cuda-mps-control  nvidia-installer  nvidia-persistenced  nvidia-smi
#nvidia-cuda-mps-server   nvidia-modprobe   nvidia-settings      nvidia-uninstall

# check nvidia containers running
crictl ps | grep nvidia-gpu

# OUTPUT
25eec6551f9e5       2f78042af231d       7 hours ago         Running             nvidia-gpu-device-plugin   0                   ca9dd0d8e2822       nvidia-gpu-device-plugin-small-cos-674fk
Cool! Some things are what I assumed and others I have some more digging to do!