TL;DR: Running a single node cluster avoids most of the following issues, but I wanted to run a VMware cluster closer to “real” production. Focusing on network design before jumping into ESXi installations will pay dividends.
Intro
In the fall of 2022, I decided to build a VMware homelab so I could explore Anthos clusters on VMware a bit closer. A few jobs back, I administered VMware and in 2017 I blogged about creating a single node VMware homelab. I thought it couldn’t be that hard to build a multi-node VMware homelab with a few Intel NUCs. I was wrong.
The difference in settings up a single node ESXi host vs. a cluster of 3 ESXi hosts was staggering. Mainly the networking design required.
At first I was going to update my older VMware install posts but, after hitting enough issues, it was clear I needed to start over. My goal is to start with an overview of things to consider before jumping in. Reading my series should save you many hours of problems if you have similar ambitions to build a multi-node lab.
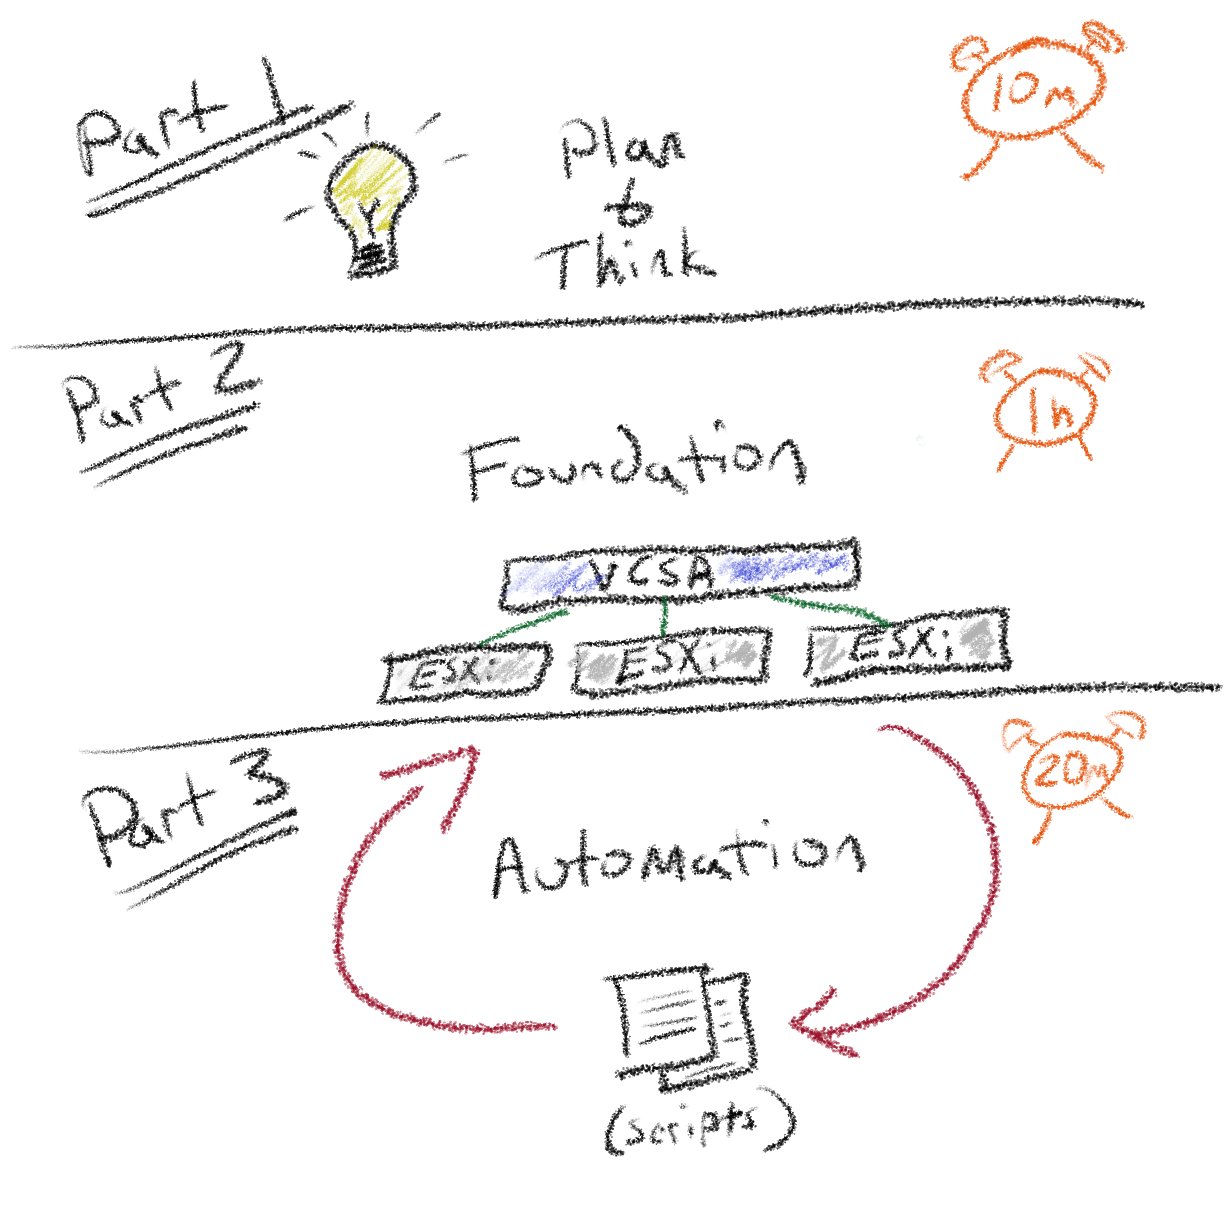
This is Part 1 of a 3 part series I’ve called VMware homelab:
- [Part 1]: Introduction & Considerations
- [Part 2]: How to install a vSphere cluster at home
- [Part 3]: How to configure vSphere networking and storage
Overview
My goal for this post is to identify areas that I found challenging or surprising. Many of the topics are things I learned the hard way. Since homelabs are not the same for everyone, I hope this guide is generic enough for most.
Consider this guide to be more of a “choose your own adventure.” I’ll explain what direction I’m choosing and why in each section. The sections should nudge you in a direction that avoids future pitfalls.
The 2nd and 3rd part of this series are more technical, covering the exact steps I took to build my lab.
Why you should read this
If you desire to rebuild your entire vSphere environment under 2 hours and with less than 10 commands (my exact commands). You can also jump to the Conclusion in Part 3.
This post is written for anyone that’s interested in homelabs and VMware. It’s a bonus if you’ve used VMware before as this might serve as a refresher.
It’s important to understand the distinction between homelab and a production. My choices would be very different if I was designing a production system. They would also be different if I didn’t use NUCs for hosts, as you’ll find out.
Note
By the end of the series, you should feel comfortable designing a VMware homelab that fits your exact requirements.
There’s a couple soft assumptions:
- Familiar with networking concepts
- VLANs
- OSI model
- General routing
- Familiar with VMware concepts
- VCSA: vCenter Server Appliance VM to manage clusters and hosts
- ESXi: The OS for vSphere hosts
- DRS: Distributed Resource Scheduler that spreads the VMs across hosts inside a cluster
- datastores: Storage for VMs
- vMotion: A zero downtime live migration of workloads from one server to another
Much of my early career involved managing and upgrading VMware hosts but I rarely designed a VMware datacenter from scratch.
Starting at the end
By sharing the end state, you can determine how closely my architecture aligns with your requirements.
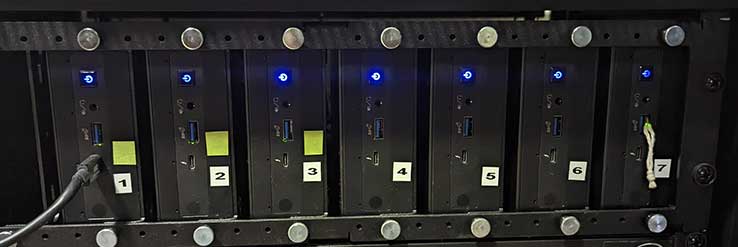
I’m using 3 Intel NUC 11 Pros with 8 cores and 64GB RAM. These models come with a 2.5G NIC and I happen to have a switch that supports 2.5G. I also have a QNAP ISCSi/NFS storage appliance that supports 2.5G.
My plan is to add a USB NIC to each host and split “frontend” traffic from “backend.”

Solution summary
- The network supports 2.5G and 1G speeds
- The switches are L3 and I can configure vLANs
- Operations (MGMT / vMotion / Storage) all go through the 2.5G switch using QoS
- The iSCSI/NAS appliance supports 2.5G
- VMware traffic is isolated to another 1G switch to prevent conflicts with operations
Warning
VMware’s official docs recommend using redundant NICs if there’s 2. Meaning, share all traffic across the two NICs so one can fail without impacting availability. I would have went that route if the NIC speeds were the same.
Considerations that impact your design
To keep things simple, I wanted to boil everything down to 3 key factors:
- Why are you doing this?
- How long do you need your lab?
- To HA or not HA?
Answering those 3 questions should give you a much clearer starting point for subsequent sections.
1. Why are you doing this?
It sounds silly, but if we wanted to test vSAN, our design would look very different than if we wanted to experiment with Anthos clusters on VMware. Mainly, vSAN would require more attention to storage / networking. Much like considerations would change for experimenting with NSX-T or Tanzu.
In my case, I want to test Anthos clusters on VMware in a lab that mirrors closer to a “real” production cluster.
2. How long do you need your lab?
Do you want a permanent lab to use and upgrade “like production” or only spin it up when you need it?
Do you care if it goes down? Is rebuilding it a nightmare? Do you plan on rebuilding once a month? Annually?
VMware is a paid for product. However, Anyone can use the software in evaluation mode for 60 days (begins when you turn on the ESXi host). At the expiration, all ESXi hosts are removed from vCenter and VMs are prevented from restarting or powering on.
If 60 days is enough and rebuilding isn’t an issue, that is a great solution. Go to the site, download the software, and run in eval mode.
If it’s not enough, there’s a program called VMUG Advantage.
VMUG Advantage is the best way to gain the technical skills to accelerate your success with exclusive access to 365-day evaluation licenses for 15+ VMware solutions
The membership costs $200 and is good for a year. With the membership you get serial numbers to use with your hosts.
Note
If you plan on signing up, your benefits aren’t immediately available. Within 1 full business day you will receive an email from noreply@kivuto.com prompting you to create your account.
I use the VMUG advantage option so I can use the lab for over 60 days without rebuilding.
3. To HA or not HA?
There’s a few layers of HA (High Availability) when it comes to VMware clusters, I try to apply the following advice to most of them.
When I started setting up my 3 hosts, I was drinking all of the HA Kool-Aid. I wanted HA everything. As I made progress, I realized I didn’t require HA vCenter or vSphere HA for any technical reasons beyond the fact that it sounded cool.
Consider why are you setting up HA? Is the rest of your infrastructure highly available?
It’s totally fine to setup HA if you have availability requirements or if you’re trying to learn more about it. For me, I could skip a more complex solution in favor of not using all HA features.
Essentials
Those 3 questions should have provided us a rough idea of what we’re setting out to build. To recap:
- Why? I want to test Anthos on a homelab closer to “real” production clusters
- How long? More than 60 days
- HA? No technical requirements for availability
Which means I’ll have to consider multi-node ESXi hosts to get closer to production and sign up for the VMUG advantage so I can get licenses longer than 60 days. Since I have no HA requirements, I’ll use it where possible but I wont go out of my way to enable features that require more than I can provide (networking, storage, etc).
I’ll also have to go deeper into my network design and setup since I want the hosts and VMs to communicate.
Additional considerations
Let’s dive a deeper into questions and concepts to shape our plan.
What hardware do you have?
Before talking about homelabs, it’s always recommended to follow the official ESXi hardware requirements including searching compatibility for each hardware component.
I had a few extra NUCs and choose to use a non-supported setup. I didn’t realize this when I started, but my NUCs required a special driver for the 2.5G NIC. That meant I had to custom build an ISO with those drivers. William Lam has a blog with lots of NUC content (link), he even supports the driver I ended up using to solve my install issues.
I wanted 2 uplinks so I could divide traffic, so by adding the USB NICs meant I had to also install USB drivers for the NICs.
Note
If I were to do it again, I would look for a small host that has many onboard NICs vs. using USB NICs. Using USB NICs is unsupported and requires advanced configuration.
Does your CPU architecture between hosts match?
If you have an AMD processor and an Intel processor in two different hosts, you’ll have additional complexities with vMotion (or running in compatibility mode).
Is your CPU supported?
I had a small form factor PC with a lot of RAM that I wanted to add to the VMware cluster (a 4th ESXi node). The CPU was an Intel 12th gen Alder Lake.
As a result, the ESXi installer boot crashed unless I added cpuUniformityHardCheckPanic=FALSE to the boot options. It failed because ESXi didn’t understand performance verses efficiency cores. Had I used an Intel Xeon D processor, or any supported CPU, there would be 0 issues.
A longer term solution would be to build a custom ISO with those options included in the boot menu automatically.
Do you have enough RAM?
When I started, my hosts had 16GB RAM and I quickly found out that RAM was maxed out by the vCenter VM. The tiniest vCenter appliance requires 12GB of RAM.
If you’re building a smaller homelab, it’s important to understand that RAM is one of the most in demand resources. Storage can be thin provisioned and CPUs can share time slices. If you invest in anything for your homelab, focus on RAM.
Networking
This was the first error of my setup. In previous, single-node, ESXi clusters I took the default networking. It seemed to work without much fuss. When it came to managing the networking of multiple hosts it became a little confusing.
Mainly how the physical interfaces get IPs and route VLANs. I cover advanced networking in the 3rd part of this series.
Tip
After there’s a complete network design with VLANs/subnets defined, I would strongly suggest taking it one step further and defining the static IPs for each host and vCenter.
I use a Google sheet as a basic inventory for hosts and VMs.

Network security considerations
As we plan the network, ensure there’s connectivity between VLANs where there should be and that there isn’t where there shouldn’t.
It can be frustrating debugging DHCP or TCP connectivity only to find out a firewall was blocking traffic.
Your ESXi host uses several networks. Use appropriate security measures for each network, and isolate traffic for specific applications and functions. Isolation prevents snooping. Having separate networks is also recommended for performance reasons. In summary:
- Ensure that vMotion traffic does not travel over networks where VMs are located
- Ensure that other storage and application networks are isolated
- Isolate client traffic, CLI / API traffic, and 3rd party software traffic from other traffic
- Use a management network
- Should be accessible only by system, network, and security administrators
- Use jump box or virtual private network (VPN) to secure access to the management network
- Strictly control access within this network
- VM traffic can flow over one or many networks
- Enhance the isolation of VMs by using virtual firewalls that operate on the virtual network controller which migrate with the VM if it changes hosts
DHCP vs. Static IPs
I was able to use DHCP for my vSphere cluster (and then assigned the DHCP IP a fixed reservation after boot). I thought this was cool at first, saving me some keystrokes at boot. However, I had things like vCenter reboot and grab a new IP and I spent way too long tracking it down before realizing my errors.
If I was doing it over again, I would probably plan out each hosts static IP details.
vSphere Standard Switch (vSS) or vSphere Distributed Switch (vDS)
I’ll go deeper into VMware networking in future parts of this series. For now, we need to understand the basics of vSS and vDS along with their pros and cons.
The difference between the two becomes more important if you have multiple hosts. If you only have a single host, there’s not a huge benefit of one over the other.
vSphere Standard Switch (vSS)
This is the standard networking that comes default with ESXi installs. It’s configurable via the CLI or vCenter and can be used with a single host or multiple (official docs).
The general concept is each host manages their entire ESXi networking stack separately.
- Pros
- Very easy to automate / bootstrap
- Isolated per host
- Simple compared to vDS
- Cons
- No QoS
- No centralized management
vSphere Distributed Switch (vDS)
A vDS can only be managed through VCSA (vCenter). There’s limited options to configure it via the ESXi CLI; however I do believe the VCSA API exposes endpoints for automation.
The primary benefit is that vCenter manages the connections and switches across all hosts. The network becomes a “smart” virtualized network (official docs). With the new cluster-level networking oversight, you can set QoS (Quality of Service) with vSphere Network I/O Control. This allows for certain traffic, such as vMotion, be prioritized over others.
- Pros
- QoS
- Centralized management
- Cons
- Hard to automate
- Requires more planning to get started
I ended up choosing vDS so I can use QoS and centralized management.
Storage options
By default, ESXi install on an open disk and creates a datastore with the remaining empty space.
For best performance, also provide a separate persistent local device with a minimum of 32 GB to store the /scratch and VMware Tools partitions of the ESX-OSData volume. The optimal capacity for persistent local devices is 128 GB. The use of SD and USB devices for storing ESX-OSData partitions is being deprecated.
View the entire list of boot disk requirements on the official doc about Hardware and System Resources.
Think about what options you plan to use for storage? OS Boot? Local datastores? vSAN?
Boot disk
Early automation blogs, including mine, self installed (booted to memory, installed to USB self and booted the host). No longer supported or strongly not suggested.
VMware is moving away from the support of SD cards and USB drives as boot media. ESXi Boot configuration with only SD card or USB drive, without any persistent device, is not recommended with vSphere 7 Update 3. Customers are advised to move away from SD cards or USB drives completely. (docs)
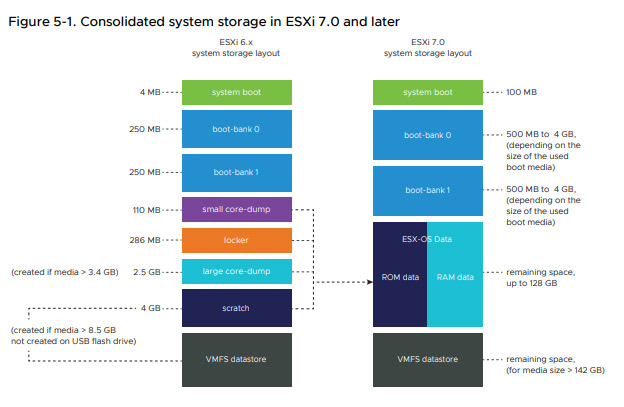
ESXi requires a boot disk of at least 32 GB of persistent storage. I believe the preferred amount is 128GB and I ended up using 1TB NVMe drives. The following picture shows a sample auto-partition between ESXi 6.x and 7.x:
Note
If possible, I would prioritize shared storage over large/fast local disk if you’re using more than 1 host.
Shared storage
While not required, an ISCSi SAN shared between each ESXi host has many benefits such as reducing vMotion traffic to compute only.
Datastores could be shared between VMs as additional file system volumes. This is helpful if I start to test the CSI driver for VMware (out of scope for this article).
If you didn’t have shared storage between hosts and wanted to boot a VM from an ISO, you’d have to upload it to each of the datastores. With shared storage, I can upload it once and reference it on multiple hosts.
Warning
Be careful adding a volume you don’t intend on using with VMs. I added a NFS share with ISOs and had a hard time unmounting it. After some troubleshooting, it turned out a vCluster management VM used it for OS disk.
If you do end up with a large number of VMs running on your cluster, and they used shared storage, there’s a possibility to restore the VMs on a fresh vSphere setup. VMware has the ability to scan datastores for existing VMs. This could be appealing if you wanted a quick way to rebuild without recreating each VM.
About vSAN
The idea behind vSAN is that I can use each hosts local disk in a cluster to virtualize storage and present it to VMs. I was hoping to check this feature out, however, it requires local disk that has 0 partitions. As a result, I cannot share my boot disk and vSAN. I looked more into the requirements and it seemed like the hardware and resource requirements would not be worth my small lab. I did see some folks online using USBs and USB storage drivers as a cost effective solution around the partition requirement.
Since I didn’t have extra local disks or USBs, I opted out of vSAN. It would be cool to explore in the future or as my lab grows.
Other lessons learned
vCenter cannot be vMotioned. This makes sense, but I learned the hard way. There is vCenter HA which installs a vCenter VM on each host and could provide fail-over. In my case I was trying to test my networking and breaking vCenter trying to move it.
Related to the above, that made me want to move vCenter to my MGMT network so I can make VM Network changes without it impacting connectivity.
I’m not opposed to joining the Customer Experience Improvement Program that VMware keeps prompting, but I found out some features are blocked by your acceptance. They really want you to join the program, I’m just breaking it to you sooner than later.
Wrap up
I now have a clear solution to target:
- Use vDS switches with 2 NICs per host
- Operations network traffic (MGMT / vMotion / Storage) uses QoS
- VMware network traffic is isolated to another vDS Switch
- iSCSI datastore is used for shared storage on VMs
- VCSA to use the management (operations) network vs. VM network
Next: How to install vSphere on a NUC
The next part of this series is the technical steps to build the lab. Starting with the ISO creation and install of ESXi and VCSA.
Check out Part 2 here: How to install a vSphere cluster at home