
Warning
This blog’s solution is only for Dream Machines running Unifi OS v1.0 using containers.
In early 2023, Ubiquiti released version 2.0 and shortly after 3.0 (releases). The newer versions require modifications to my solution. Luckily, the comments at the bottom discuss how to update or modify the solution to work on the newest Unifi OS!
Thanks @Stephen and @Matt for the solution and prompt replies in the comments.
The fundamental problem is:
AT&T does not allow you to remove their residential gateway, even if you’d prefer to use something better.
You must use AT&T’s provided residential gateway, such as an NVG5x9, BGW210, or 5268AC, to authenticate to AT&T’s fiber internet service.
Considering that AT&T’s gateway handles all inbound and outbound traffic, it can cause problems if you run another router gateway behind it. Some AT&T gateways have a mode called “IP passthrough” to prevent managing traffic twice. IP passthrough allows you to specify a different device to act as the WAN gateway, and the original gateway forwards all traffic to it without interfering. Even with IP passthrough, you’re limited by AT&T’s gateway NAT table size and you still have an extra hop.
Tip
Even with the NAT limitations, I would recommend using the IP passthrough mode as a first choice to bypass AT&T for most folks due to ease of setup.
To be honest, I haven’t had many issues using IP passthrough mode, but I couldn’t resist downsizing my network devices and hacking on some hardware.
I’ve always been on the fence about “bypassing” AT&T’s device because I didn’t understand how I could revert if I got stuck. It turns out that the bulk of the work is prep. You can get to the very end and revert everything on the UDM Pro by running the following commands:
# stop the wpa_supplicant-udmpro container
podman stop wpa_supplicant-udmpro

# delete the copied data and boot script
rm -rf /mnt/data/podman/wpa_supplicant /mnt/data/on_boot.d/10-wpa_supplicant.sh
If you want a “clean” reset, download backups, factory reset, and restore.
How does AT&T Fiber work?
Before getting started, let’s understand exactly what the problem is. Below is a traditional NVG589 setup with 802.1X EAP-TLS details.
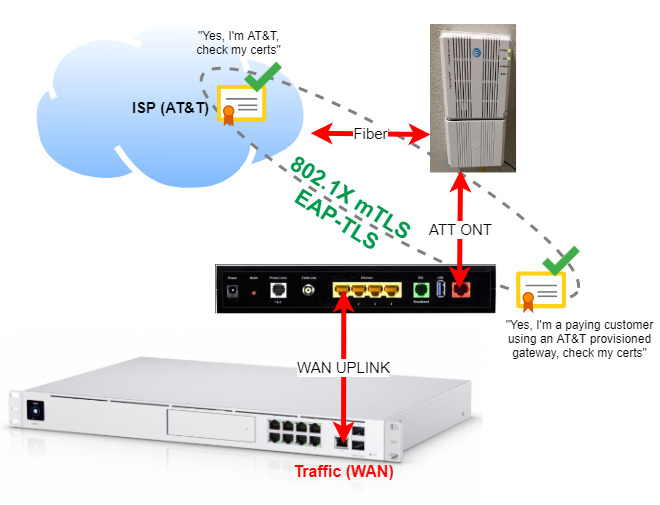
The Optical Network Terminal, ONT, converts “light” data (fiber) to electrical signal to pass through ethernet wires in your home. The actual optical network terminal is the white box (top right).
Info
For AT&T Fiber to work, the ONT port must also provide EAP-TLS 802.1X authentication to AT&T.
802.1X is usually used for enterprise WiFi authentication. AT&T fiber uses 802.1X to authenticate their customer’s residential gateway.
Let’s break down what 802.1X is; only three components are needed for 802.1X authentication.
- A supplicant or client (NVG589 ONT) to initiate 802.1X negotiation
- A controller (???) to handle access before and after 802.1X authentication
- A RADIUS server (AT&T) to authenticate the client.
A supplicant is an entity at one end of a point-to-point LAN segment that seeks to be authenticated by an authenticator attached to the other end of that link.
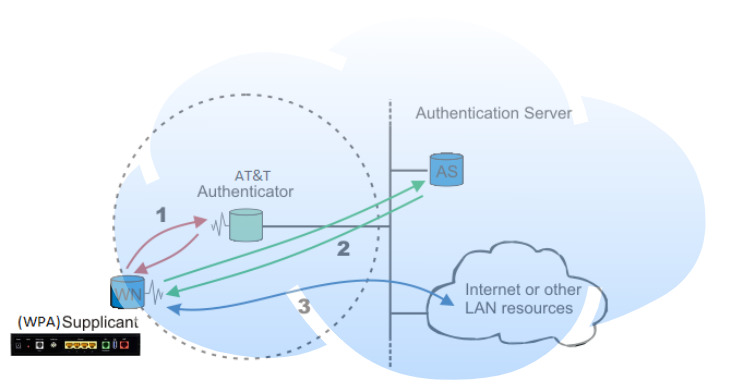
In AT&T’s default setup, we have:
- NVG589: The supplicant (client)
- ???: The controller handling authentication access
- AT&T RADIUS Server: Based on hardware AT&T TLS certificates
The NVG589 ONT port (1) handles 802.1X authentication (2), allowing for internet (3) traffic.
Steps (1) and (2) are EAP. EAP stands for Extensible Authentication Protocol and is how AT&T gateways authenticate.
Note
One very significant factor about EAP-TLS is that it requires mutual TLS (mTLS). Notice a couple of pictures above that AT&T provides identification (TLS) and the NVG589 (TLS).

How do we bypass the AT&T gateway?
We now know what the problem is: AT&T requires 802.1X authentication using certificates only available on their gateways. How can we bypass the gateway altogether if certificates are required?
There’s a handful of accepted methods with varying degrees of complexity. It also matters what your goal is and what devices you have.
Note
I’m testing this on a UDM Pro (v1.8.5)
This article focuses on using wpa_supplicant, but it’s worth understanding what alternatives exist and why. Let’s start with the easiest option.
The “dumb switch” method
This is a way to trick your AT&T connection using a switch and MAC spoofing. You trick the optical network terminal into thinking your WAN network interface is the ONT interface on your AT&T gateway. There’s more detailed information in this dslreports.com post or this unifi post. The process is, authenticate with the NVG589 then swap gateway cables to your WAN spoofed uplink. Once completed, the connection operates as intended until reset or rebooted.
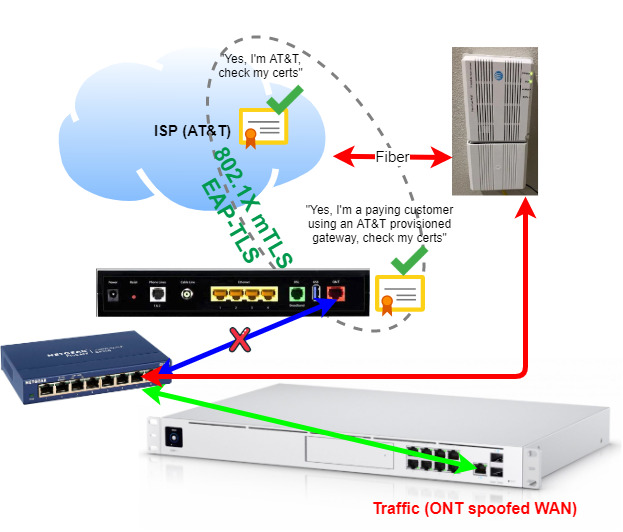
It’s a blue-green deployment for WAN uplinks. It seems very simple to test but not easy to maintain long term.
Warning
Note: AT&T is currently installing fiber infrastructure that uses different authentication methods. If you’re in one of those areas, none of these bypass methods will work. See this thread for more info.
The EAP proxy method
This method proxies EAP packets between network interfaces for authentication, leaving other packets alone for a direct connection. The proxy is ran as a process, or a container, on your gateway. It looks for EAP traffic and forces it to talk to the NVG589.
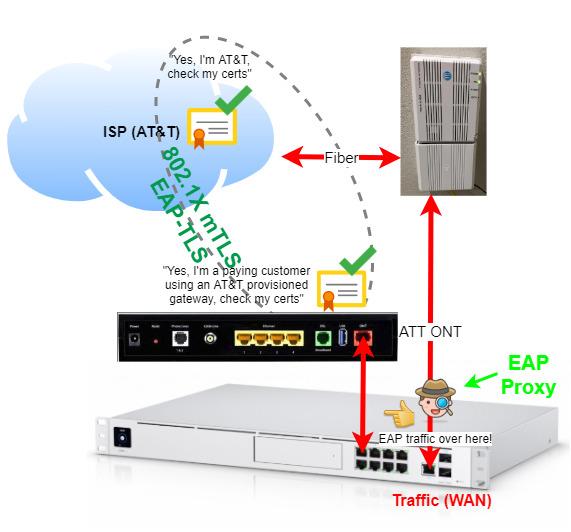
The EAP proxy listens on both interfaces for EAP over LAN frames and forwards EAP packets between interfaces. It works well because there is no need for an advanced setup.
The negative is, that you’re still taking up a port and relying on a running gateway at all times for authentication. Find more details here.
The netgraph method
Made popular by GitHub user MonkWho, this option is mainly used by pfSense users and involves using netgraph to bridge 802.1X traffic to the NVG589 ONT port. The result is a similar solution to the EAP proxy, only using a different tool. This solution still requires relying on a running gateway at all times for authentication.
The WPA supplicant method
This is the method we’re implementing. Earlier I mentioned that 802.1X only needs a supplicant, controller, and RADIUS server to work. If the AT&T gateway certificates exchanged for 802.1X authentication are valid, does it matter what the supplicant is? 🙃

wpa_supplicant is a binary that acts as a supplicant for 802.1X (AT&T). I like this option because of the lack of devices and cables; it’s “clean.”
The plan
- Get keys from a working AT&T gateway
- Gain admin access on a NVG589 (root)
- Copy certificates and
mfg.dat
- Extract private keys from
mfg.datusing mfg_dat_decode tool - Copy
.pemfiles andwpa_supplicant.confto UDM Pro - Run wpa_supplicant on the UDM Pro
- …
- Profit
Get certificates from a working AT&T gateway
To get the data from an AT&T gateway, we must use public knowledge of security vulnerabilities in old NVG589 gateway’s firmware to gain root access.
If you’ve spent time searching this topic, you’ll see that most people buy their rooted AT&T certificates from eBay. This could be because rooting is too complex or not worth their time. I love learning new skills, and I’m ready to get my hands dirty, let’s give it a try!
To extract the certificates, we generally have the following options:
- Hardware exploits (reading data via physical chip)
- Pros: works 100% of the time
- Cons: hard
- Software exploits (reading data via open exploits)
- Pros: easy
- Cons: patched on modern devices
Gain admin access on a NVG589 (root)
I first encountered a promising thread about using software exploits by upgrading or downgrading the NVG firmware to an exploitable version.
The CVE-2017-14115 exploit:
The AT&T U-verse 9.2.2h0d83 firmware for the Arris NVG589 and NVG599 devices, when IP Passthrough mode is not used, configures ssh-permanent-enable WAN SSH logins to the remotessh account with the 5SaP9I26 password, which allows remote attackers to access a “Terminal shell v1.0” service, and subsequently obtain unrestricted root privileges, by establishing an SSH session and then entering certain shell metacharacters and BusyBox commands.
Unrelated, can we talk about how crazy it is that there was a WAN exposed, HARD-CODED, SSH login? Oof.
I abruptly learned that AT&T patched most of the exploits on modern, internet-connected routers. No matter how many times I upgraded or downgraded, I could not root my NVG589.
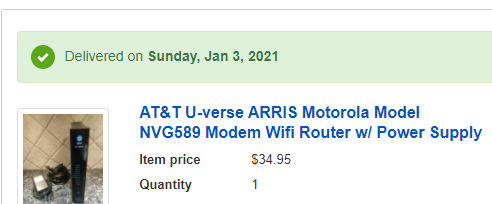
As I went deeper down the rabbit hole, it seemed like my only option was going to be exploiting the hardware. So I bought another NVG589 off of eBay to avoid bricking my only working device.
When the NVG589 arrived, I plugged it in offline.
Luckily it had older firmware that allowed me to downgrade to version 9.2.2h0d83 and SSH into it with no problems.
After using the default username remotessh and password 5SaP9I26 to log in, run the following commands:
ping -c 1 192.168.1.254;echo /bin/nsh >>/etc/shells
ping -c 1 192.168.1.254;echo /bin/sh >>/etc/shells
ping -c 1 192.168.1.254;sed -i 's/cshell/nsh/g' /etc/passwd
Afterward, restart the session and switch to root:
exit
ssh remotessh@192.168.1.254
Type ! to switch to root shell.
Copy certificates and mfg.dat
# mount, copy, and unmount the data to a local directory
mount mtd:mfg -t jffs2 /mfg && cp /mfg/mfg.dat /tmp/ && umount /mfg

# change into the tmp directory
cd /tmp

# create a tarball called cert.tar containing all certs in /etc/rootcerts
tar cf cert.tar /etc/rootcert/

# copy cert.tar and mfg.dat to a browsable URL on the gateway
cp cert.tar /www/att/images
cp /tmp/mfg.dat /www/att/images
To download the two files, right-click > Save Link As… 192.168.1.254/images/mfg.dat and 192.168.1.254/images/cert.tar to your local device. When I clicked on the links, instead of downloading, my browser freaked out.
Extract private keys from mfg.dat using mfg_dat_decode tool
The mfg.dat is a file like you might use to flash a BIOS. It is an entire flash “state,” but we only want the certificates. The data can be manually mounted and extracted if you’re savvy in this field. However, there is nifty utility (mfg_dat_decode tool) that does everything for you including bundling the output in a nice file.
Following the instructions from here:
# extract the mfg_dat_decode after downloading
cd ~/Downloads/
tar xzvf mfg_dat_decode_1_04.tar.gz

# make executable
mv linux_amd64/mfg_dat_decode /usr/bin/
chmod +x /usr/bin/mfg_dat_decode

# move contents to working dir
mv ~/Desktop/mfg.dat .
mv ~/Desktop/cert.tar .

# extract certs
tar xvf cert.tar

# run the program
mfg_dat_decode
Output is similar to
802.1x Credential Extraction Tool
Copyright (c) 2018-2019 devicelocksmith.com
Version: 1.04 linux amd64

Found client certificate for Serial Number: XXXXXXXXXX-XXXXXXXXXXXXX

Found certificates with following Subjects:
	XX:XX:XX:XX:XX:XX
				 expires 2034-07-29 19:46:26 -0500 CDT
	Motorola, Inc. Device Intermediate CA
				 expires 2033-04-30 12:36:29 -0500 CDT
	Motorola, Inc. Device Root CA
				 expires 2038-04-30 11:30:26 -0600 CST
Verifying certificates.. success!
Validating private key.. success!
Found valid AAA server root CA certificates:
	System Infrastructure Root CA (SHA256)
				 expires 2044-07-10 14:12:33 -0600 CST
	ATT Services Inc Root CA
				 expires 2031-02-23 17:59:59 -0600 CST
	Frontier-RootCA
				 expires 2024-05-01 08:20:27 -0500 CDT
Successfully saved EAP-TLS credentials to
	~/Downloads/EAP-TLS_8021x_XXXXX-XXXXXXXX.tar.gz
~/Downloads/EAP-TLS_8021x_XXXXX-XXXXXXXX.tar.gz contains all the files we need to configure the wpa_supplicant binary.
Note
Before moving forward, I connected the NVG589 as-is to validate my eBay NVG589 could get service as-is. Everything worked after a few minutes, I didn’t need to call AT&T to “authorize” the router or anything. My existing service worked with the new gateway, now let’s swap it out.
Copy .pem files and wpa_supplicant.conf to UDM Pro
Extract all .pem files and wpa_supplicant.conf from ~/Downloads/EAP-TLS_8021x_XXXXX-XXXXXXXX.tar.gz to your UDM Pro. WinSCP can be used on Windows computers without SCP.
scp -r *.pem root@192.168.1.1:/tmp/
root@192.168.1.1's password:
CA_001E46-xxxx.pem                                                          100% 3926     3.8KB/s   00:00
Client_001E46-xxxx.pem                                                      100% 1119     1.1KB/s   00:00
PrivateKey_PKCS1_001E46-xxxx.pem                                            100%  887     0.9KB/s   00:00

scp -r wpa_supplicant.conf root@192.168.1.1:/tmp/
wpa_supplicant.conf                                                         100%  680     0.7KB/s   00:00
Copy the files to a permanent location like /mnt/data/podman/wpa_supplicant/ for future use on the UDM Pro.
# login
ssh root@192.168.1.1

# make directory
mkdir /mnt/data/podman/wpa_supplicant/

# copy files
cp -arfv /tmp/*pem /tmp/wpa_supplicant.conf /mnt/data/podman/wpa_supplicant/
Deleting the old files is unnecessary as /tmp/ is purged after every reboot.
Update the wpa_supplicant.conf file with the correct file paths of your .pem certificate files.
sed -i 's,ca_cert=",ca_cert="/etc/wpa_supplicant/conf/,g' /mnt/data/podman/wpa_supplicant/wpa_supplicant.conf

sed -i 's,client_cert=",client_cert="/etc/wpa_supplicant/conf/,g' /mnt/data/podman/wpa_supplicant/wpa_supplicant.conf

sed -i 's,private_key=",private_key="/etc/wpa_supplicant/conf/,g' /mnt/data/podman/wpa_supplicant/wpa_supplicant.conf
After running the sed commands, verify your paths in wpa_supplicant.conf look similar.
# cat wpa_supplicant.conf
# Generated by 802.1x Credential Extraction Tool
# Copyright (c) 2018-2019 devicelocksmith.com
# Version: 1.04 linux amd64
#
# Change file names to absolute paths
eapol_version=1
ap_scan=0
fast_reauth=1
network={
        ca_cert="/etc/wpa_supplicant/conf/CA_001E46-xxxxxxxx.pem"
        client_cert="/etc/wpa_supplicant/conf/Client_001E46-xxxxxx.pem"
        eap=TLS
        eapol_flags=0
        identity="10:05:B1:xx:xx:xx" # Internet (ONT) interface MAC address must match this value
        key_mgmt=IEEE8021X
        phase1="allow_canned_success=1"
        private_key="/etc/wpa_supplicant/conf/PrivateKey_PKCS1_001E46-xxxxxx.pem"
}
If you see WARNING! Missing AAA server root CA! Add AAA server root CA to CA_001E46-xxxxxx.pem you might have done something wrong. I had this happen the first time, and it was due to not extracting the certificates in the same directory.
Podman
Let’s talk about Podman.

UDM Pro runs the unifi-os in a container on Podman. Podman is almost a 1:1 replacement for Docker. Without getting too deep into how containerization works, let’s understand that a container is simply a process. A process running on the host like any other.
There’s container magic limiting the hosts resource consumption, but it’s still a process running at the end of the day.
Even though I trust the UDM Pro to run containers, I don’t trust it to run ANY containers. Let’s look at the wpa_supplicant Dockerfile based off of the wpa_supplicant-udmpro repo.
FROM alpine
RUN apk add --no-cache wpa_supplicant
ENTRYPOINT ["wpa_supplicant"]
CMD []
In this case, it’s an Alpine container with a wpa_supplicant package installed. Running this container is almost identical to executing a wpa_supplicant command on the OS. Considering how basic the container is, let’s create it ourselves.
Create local docker image
This step is optional but I like to know the source of things running on my network. Optionally, skip this step and use pbrah/wpa_supplicant-udmpro:v1.0 for the container image for future commands.
Note
You should build the wpa_supplicant container on the UDM Pro to avoid issues with ARMx64 architecture.
On the UDM Pro, create a file named Dockerfile with the following content
FROM alpine
RUN apk add --no-cache wpa_supplicant
ENTRYPOINT ["wpa_supplicant"]
CMD []
Build the container using the name and tag of jimangel/wpa_supplicant-udmpro:v1.0 (note the trailing . in the command).
podman build --network=host -t jimangel/wpa_supplicant-udmpro:v1.0 .
Confirm the new image exists.
podman images | grep udmpro
Output looks similar to
localhost/jimangel/wpa_supplicant-udmpro v1.0 5c56e6248ddd 35 hours ago 10.3 MB false
Run wpa_supplicant on the UDM pro
Assuming your UDMP connects to the internet via port 9 (the ethernet WAN port, not the SFP+ port 10), run the wpa_supplicant in the background. The ports internally are referenced starting with 0, so port 9 on the device is actually eth8 and eth9 is port 10.
podman run --privileged --network=host \
--name=wpa_supplicant-udmpro \
-v /mnt/data/podman/wpa_supplicant/:/etc/wpa_supplicant/conf/ \
--log-driver=k8s-file --restart always -d \
-ti localhost/jimangel/wpa_supplicant-udmpro:v1.0 \
-Dwired -ieth8 -c/etc/wpa_supplicant/conf/wpa_supplicant.conf
Let’s breakdown exactly what the command is doing:
- Run an Alpine container (that runs wpa_supplicant) as root (privileged) with real host networking attached
- Name the container “wpa_supplicant-udmpro”
- Mount the certs and config in the container at /etc/wpa_spplicant/conf/
- Log (k8s default?) and always restart (as recommended)
- Run the container in the background (-d detached) with an interactive terminal (-it)
- Launch
wpa_supplicant(Docker ENTRYPOINT) with the following options-Dwired -ieth8 -c/etc/wpa_supplicant/conf/wpa_supplicant.confmeaning to use the wired eth8 (-i) device to init 802.1X
You did it! It should be running now; if not, read on.
Troubleshooting and logs
I cannot express how valuable logs are at this point. Assuming things are going according to plan, we should be able to plug the WAN ONT cable in and run
podman logs -f wpa_supplicant-udmpro
Output looks similar to
Successfully initialized wpa_supplicant
eth8: Associated with XX:XX:XX:XX:XX:XX
eth8: CTRL-EVENT-SUBNET-STATUS-UPDATE status=0
...
eth8: CTRL-EVENT-EAP-SUCCESS EAP authentication completed successfully
Other helpful Podman commands include
# list all containers
podman ps -a

# list images
podman images

# inspect container
podman inspect CONTAINER_ID

# SSH / exec into a container
podman exec -it CONTAINER_ID /bin/bash

# delete container
podman rm wpa_supplicant-udmpro
Regarding troubleshooting, I read many people have issues that require spoofing ONT MAC addresses or forcing ONT traffic on VLAN 0. I didn’t have to change any of my default settings, but it’s worth keeping in mind if you run out of options.
Surviving reboots
With the above working, we are in business. However, the next time everything reboots, you’ll have to SSH into the UDM Pro and restart the container.
Most solutions for “surviving reboots” get overwritten with a firmware upgrade. However, someone figured out that Ubiquiti caches all the unifi-os debian packages installed on the UDM Pro in /mnt/data, then re-installs them on boot.
We know that unifi-os is running in a Podman container on the UDM Pro.
As a result, udm-utilities/on-boot-script was born. A debian package that installs a big for-loop service to run scripts on boot. This allows us to dump scripts in /mnt/data/on_boot.d/ to be ran at startup; always. The service translates to:
if [ -d /mnt/data/on_boot.d ]; then
	for i in /mnt/data/on_boot.d/*.sh; do
		if [ -r $i ]; then
			. $i
		fi
	done
fi
At first, I was suspicious about running a random person’s GitHub debian package on my entire home network gateway. After looking at the source code, it seemed harmless.
You can also build the debian yourself if you’re concerned about security.
I followed the following steps in this guide to install the debian package.
# log in
unifi-os shell

# download and install
curl -L https://raw.githubusercontent.com/boostchicken/udm-utilities/master/on-boot-script/packages/udm-boot_1.0.5_all.deb -o udm-boot_1.0.5_all.deb
dpkg -i udm-boot_1.0.5_all.deb

# drop back to UDM Pro
exit
Create a script 10-wpa_supplicant.sh to start the container on reboot.
vi /mnt/data/on_boot.d/10-wpa_supplicant.sh
Copy the 10-wpa_supplicant.sh example contents.
#!/bin/sh
podman start wpa_supplicant-udmpro
Make it executable.
chmod +x /mnt/data/on_boot.d/10-wpa_supplicant.sh
Test it!
# what better way than a REAL reboot!?
reboot
If everything works, you should have internet access. You can confirm by SSHing into the UDM Pro and running podman ps to check for the wpa_supplicant container.
Clean up
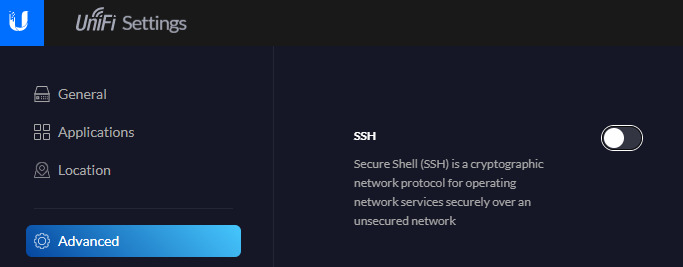
Disable SSH on the UDM Pro; it’s a good habit to leave it off.
Navigate to the UDM Pro’s IP > Settings Manage Settings > Advanced > SSH (off)
Conclusion
It works! If you step back, all you’re doing is running a (wpa_supplicant) process on the UDMP with copied certificates. 95% of the work is getting the certificates copied.
If you look at “real” running processes on the UDM Pro you see the wpa_supplicant because we launched it in a container.

Put another way:
I’m now comfortable factory resetting, stopping the container, or otherwise resetting the UDM Pro. I also feel safe in the choices I made to enable bypassing the NVG589.
It also feels good to understand exactly how I’m bypassing the AT&T router and I don’t foresee any upgrades impacting my UDM Pro.
A minor side note, myhomenetwork.att.com, which previously reported my home internet as “up” is now set to “down.”
But I’m ok with that.

Even though things are working for me, I still plan on adding additional information about dumping the NAND flash. Once I receive my gear, I’ll update this post. Good luck!
Helpful links
- SharknAT&To: AT&T exploits
- wpa_supplicant for UDM and UDM Pro
- ATT Fiber Bypass with UDP Pro
- Bypassing the AT&T Fiber Modem/Gateway with a Unifi Dream Machine Pro
- Bypassing the AT&T Fiber modem with a UniFi Dream Machine Pro
Extra: Using the SFP+ WAN port
While writing this, I switched from using my WAN 1Gb port to using the SFP+ port. Below is how I moved and reset the wpa_supplicant. This might be helpful for folks with similar ambitions.
Plug a computer directly into the UDM Pro and unplug all other cables to avoid unintentional impact.
# stop podman container
podman stop wpa_supplicant-udmpro

# delete container
podman rm wpa_supplicant-udmpro

# start up on WAN SFP port (eth9)
podman run --privileged --network=host \
--name=wpa_supplicant-udmpro \
-v /mnt/data/podman/wpa_supplicant/:/etc/wpa_supplicant/conf/ \
--log-driver=ak8s-file --restart always -d \
-ti localhost/jimangel/wpa_supplicant-udmpro:v1.0 \
-Dwired -ieth9 -c/etc/wpa_supplicant/conf/wpa_supplicant.conf

# plug in ISP cable

# follow logs
podman logs -f wpa_supplicant-udmpro

# keep watching the logs for
"eth9: CTRL-EVENT-EAP-SUCCESS EAP authentication completed successfully"

# reboot for good luck
reboot
Extra: Extract certificates from hardware
I tried to get the certificates from the hardware without using any exploits. Instead of making this post any longer, you can see my live tweet, from 2021, outlining my steps.