Warning
This post may contain inaccuracies and partial information or solutions.
To reduce my backlog of docs, I’ve decided to publish my nearly completed drafts assisted by AI.
I wrote most of the following content but used generative AI to format, organize, and complete the post. I’m sure some tone is lost along the way.
Leave a comment if you find any issues!
(originally created Dec 1st 2019)
Occasionally I found myself needing a wildcard SSL certificate outside of Kubernetes. I didn’t see a ton of documentation around creating the certificates manually and put this together.
The downside with manual creation, is manual renewal every 90 days.
Perfect for a homelab, maybe not so much in production.
1. Register a Domain
First, register a domain with your preferred registrar. I like using Namecheap.
The actual domain name isn’t terribly important since we’ll be handling most of the routing locally.

2. Generate a Wildcard Certificate with Certbot
We’ll use the certbot ACME client in a Docker container to request a wildcard certificate from Let’s Encrypt.
Run the following command, replacing the email and domain placeholders with your own info:
sudo docker run -it --rm --name certbot \
  -v "/etc/letsencrypt:/etc/letsencrypt" \
  -v "/var/lib/letsencrypt:/var/lib/letsencrypt" \
  certbot/certbot certonly \
  --manual \
  --preferred-challenges=dns \
  --email YOUR_EMAIL \
  --server https://acme-v02.api.letsencrypt.org/directory \
  --agree-tos \
  -d "YOUR_DOMAIN,*.YOUR_DOMAIN"
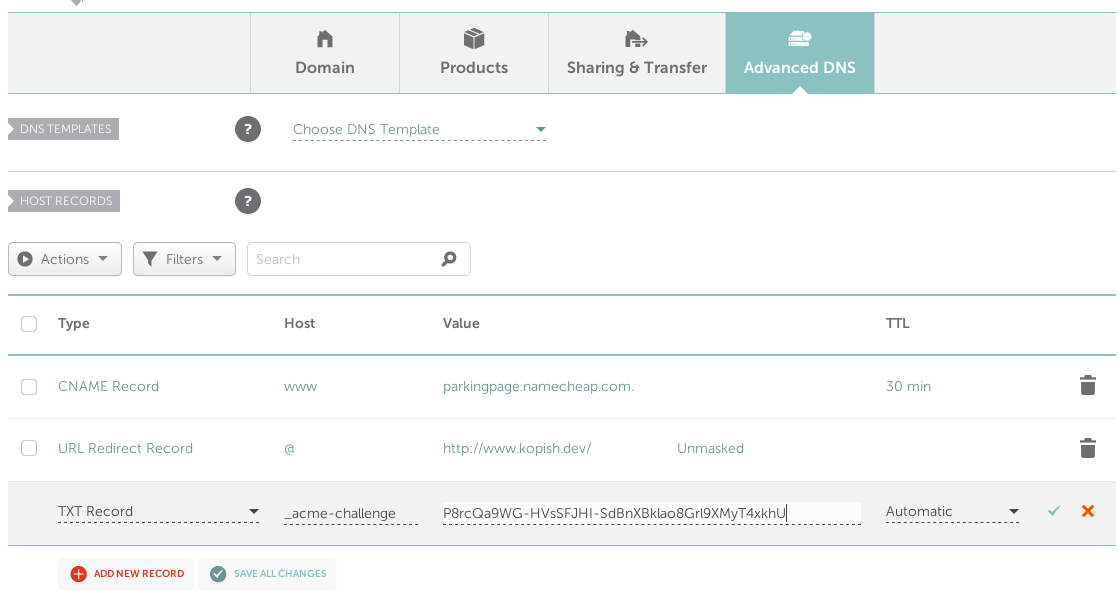
Certbot will prompt you to create a DNS TXT record to verify domain ownership:
Please deploy a DNS TXT record under the name
_acme-challenge.YOUR_DOMAIN with the following value:

XXXXXXXXXXXXXXXXXXXXXXXXXXXXXXXXXXXXXXXX

Before continuing, verify the record is deployed.
Over on your domain registrar (Namecheap for me), switch to custom DNS and add the requested TXT record:
Debugging DNS
If needed, you can use dig to check how your TXT record appears externally:
dig @8.8.8.8 -t txt _acme-challenge.YOUR_DOMAIN +short
Certificate Files
Once the TXT record is verified, Certbot will generate your certificate files:
IMPORTANT NOTES:
 - Congratulations! Your certificate and chain have been saved at:
   /etc/letsencrypt/live/YOUR_DOMAIN/fullchain.pem
   Your key file has been saved at:
   /etc/letsencrypt/live/YOUR_DOMAIN/privkey.pem
   Your cert will expire on EXPIRY_DATE. To obtain a new or tweaked
   version of this certificate in the future, simply run certbot again.
3. Create a Kubernetes Secret (optional)
If using the cert in Kubernetes, create a secret to hold the files:
sudo kubectl -n nginx-ingress create secret tls default-wildcard \
  --key /etc/letsencrypt/live/YOUR_DOMAIN/privkey.pem \
  --cert /etc/letsencrypt/live/YOUR_DOMAIN/fullchain.pem
Then reference it in your Ingress resource:
tls:
- hosts:
  - YOUR_DOMAIN
  - '*.YOUR_DOMAIN'
  secretName: default-wildcard
4. Configure Nginx (optional)
If using Nginx, add the secret name to your Ingress deployment args:
- --default-ssl-certificate=nginx-ingress/default-wildcard
That’s it! You now have a free wildcard SSL certificate ready to use across your homelab services and apps. Enjoy the flexibility and simplicity of securing multiple subdomains with a single cert.
Note
If an app won’t accept a wildcard certificate, simply repeat the Certbot steps for a single subdomain name instead of *.YOUR_DOMAIN.