Warning
This post may contain inaccuracies and partial information or solutions.
To reduce my backlog of docs, I’ve decided to publish my nearly completed drafts assisted by AI.
I wrote most of the following content but used generative AI to format, organize, and complete the post. I’m sure some tone is lost along the way.
Leave a comment if you find any issues!
(originally created June 4th 2019)
Overview
Kubectl is the beating heart of accessing Kubernetes clusters. The docs have traditionally focused on Linux, this post provides best practices for using kubectl on Windows 10, including:
- Setup kubectl for PowerShell
- Using kubectl behind a corporate proxy
- Adding clusters to kubectl
- Common multi-cluster kubectl commands
- Upgrading kubectl
- Troubleshooting and tips
With Kubernetes 1.14 announcing full support for Windows nodes, there is now more documentation around running kubectl on Windows. This post combines that with real-world experience to provide comprehensive guidance. Feel free to adapt this to your organization’s specific setup.
Key Terms to Know
| Term | Explanation |
|---|---|
kubectl |
A CLI for running commands against Kubernetes clusters |
context |
A group of access parameters (cluster, user, namespace) under a friendly name |
kubeconfig |
A file containing contexts which kubectl uses for authentication |
proxy |
A company-owned server that filters and controls external internet access |
Why this Approach?
- No manual kubeconfig file editing required
- Unified kubectl workflow across environments
- Simplified onboarding for developers
- Custom contexts per cluster and namespace
Requirements
- Windows 10
- PowerShell v5.2+
- Internet access to download kubectl.exe
Setup kubectl for PowerShell
Initial setup only needs to be done once:
-
Create a folder for kubectl binaries:
New-Item -ItemType directory -Path "C:\k" -
Add the folder to your $PATH:
[Environment]::SetEnvironmentVariable("Path", $env:Path + ";C:\k", "User")Note: Changes take effect in a new PowerShell session
-
Download kubectl.exe (version should match your cluster) and place in C:\k
-
Verify kubectl works:
kubectl version --client
Setup kubectl for use behind a company proxy
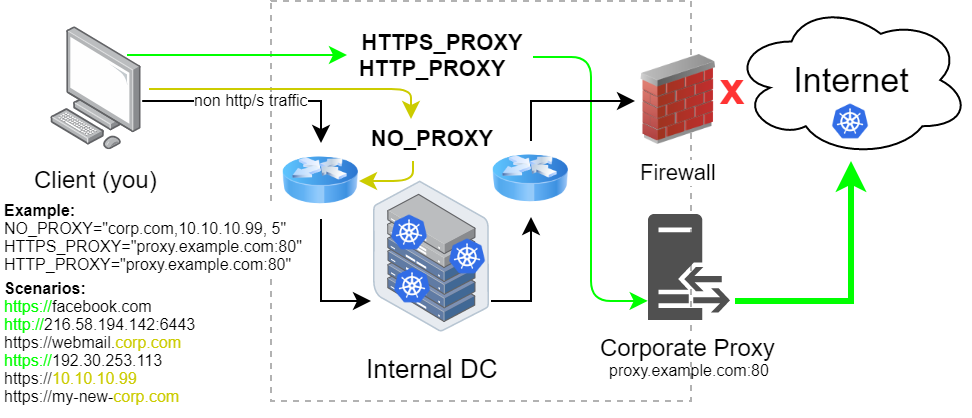
If your company uses a proxy server, you will likely need to configure the HTTP_PROXY, HTTPS_PROXY, and NO_PROXY environment variables for kubectl to connect to your cluster.
Proxy Variables 101
Proxies are meant to be a way to regulate and secure outbound traffic in large environments. Configuring your kubectl / PowerShell correctly is based on two important parameters:
- Internal Kubernetes cluster HTTPS API(s) for
NO_PROXY - Corporate proxy URL:PORT for
HTTP_PROXYandHTTPS_PROXY
| Variable | Explanation | Example |
|---|---|---|
NO_PROXY |
IPs/domains that should bypass the proxy (comma-separated) | "corp.com,10.0.0.0/8" |
HTTP_PROXY |
Proxy server URL for HTTP traffic | "http://proxy.corp.com:80" |
HTTPS_PROXY |
Proxy server URL for HTTPS traffic | "http://proxy.corp.com:443" |
When should I not set NO_PROXY?
- If your cluster is external (public)
When should I set NO_PROXY?
- If your cluster is internal (private)
Recommended Settings
To route all internal IPs directly while sending external traffic through the proxy:
[Environment]::SetEnvironmentVariable("HTTP_PROXY", "http://proxy.corp.com:80", "User")
[Environment]::SetEnvironmentVariable("HTTPS_PROXY", "http://proxy.corp.com:443", "User")
[Environment]::SetEnvironmentVariable("NO_PROXY", "localhost,127.0.0.1,10.0.0.0/8,172.16.0.0/12,192.168.0.0/16", "User")
Restart PowerShell for changes to take effect
Adding a Cluster to kubectl
-
Get cluster API server URL and auth details from your admin
-
Create the cluster context:
kubectl config set-cluster mycluster --server=https://k8sapi.corp.com:6443 --certificate-authority=./ca.crt --embed-certs -
Set credentials for the context:
kubectl config set-credentials mycluster-admin --token="<bearer token here>" -
Create a context that ties together cluster and user:
kubectl config set-context mycluster --cluster=mycluster --user=mycluster-admin -
Start using the new context:
kubectl config use-context mycluster
Common multi-cluster kubectl commands
# Show current context
kubectl config current-context

# Switch contexts
kubectl config use-context mycluster

# List available contexts
kubectl config get-contexts

# Set default namespace for a context
kubectl config set-context --current --namespace=dev

# Rename a context
kubectl config rename-context old-name new-name

# Delete a context
kubectl config delete-context mycluster
Upgrading kubectl
- Download the new kubectl.exe binary
- Replace the existing file in your kubectl directory (e.g. C:\k)
Help and Troubleshooting
Fix slow kubectl performance
Slowness is often caused by kubectl using a network drive for cache. Fix by overriding $HOME:
[Environment]::SetEnvironmentVariable("HOME", $env:USERPROFILE, "User")
Warning: This will reset your kubectl config location and remove existing config
Revert all proxy settings
[Environment]::SetEnvironmentVariable("HTTP_PROXY", $null, "Machine")
[Environment]::SetEnvironmentVariable("HTTPS_PROXY", $null, "Machine")
[Environment]::SetEnvironmentVariable("NO_PROXY", $null, "Machine")
Tips
- Use
kalias instead ofkubectlby renaming binary to k.exe - Backup kubeconfig with:
$env:KUBECONFIG_SAVE=$env:KUBECONFIG - Restore kubeconfig with:
$env:KUBECONFIG=$env:KUBECONFIG_SAVE
With this configuration, you’ll have a robust kubectl setup on Windows that works seamlessly with corporate proxies and multiple Kubernetes clusters. The key is leveraging contexts to organize access to clusters and namespaces. Combine this with PowerShell environment variables for dynamic configuration.