
Upstream Kubernetes on a Raspberry Pi cluster
I’ve been part of the Kubernetes release team since v1.12 and always wanted a mini-homelab to test alpha or beta Kubernetes release candidates.
Early Raspberry Pi’s didn’t have the computing power necessary to run full Kubernetes. When the Raspberry Pi 4 was announced with four cores and 4GB ram, it seemed like a perfect time to explore this idea further.
I also wanted to check out the inlets operator. Inlets allows you to tunnel a (cloud server’s) public IP to your private cluster. The inlets operator lets you expose Kubernetes services over that public IP. Using inlets, I can have a 16CPU x 16GB cluster exposed on the internet for less than it would cost me to run entirely in the cloud.
Before going further, if you don’t want to build unreleased versions of Kubernetes, there are other more straightforward and reliable ways to run stable versions of Kubernetes on Raspberry Pi’s. Mainly because they use officially released Debian packages instead of binaries. One example of that would be rak8s by Chris Short.
This post builds on top of the incredible work that Christian Schlichtherle and Alex Ellis have done in the SBC space.
In most blogs involving Raspberry Pi’s, you never see the back of their cluster. I’m very proud that there is a single cord to power the entire cluster:
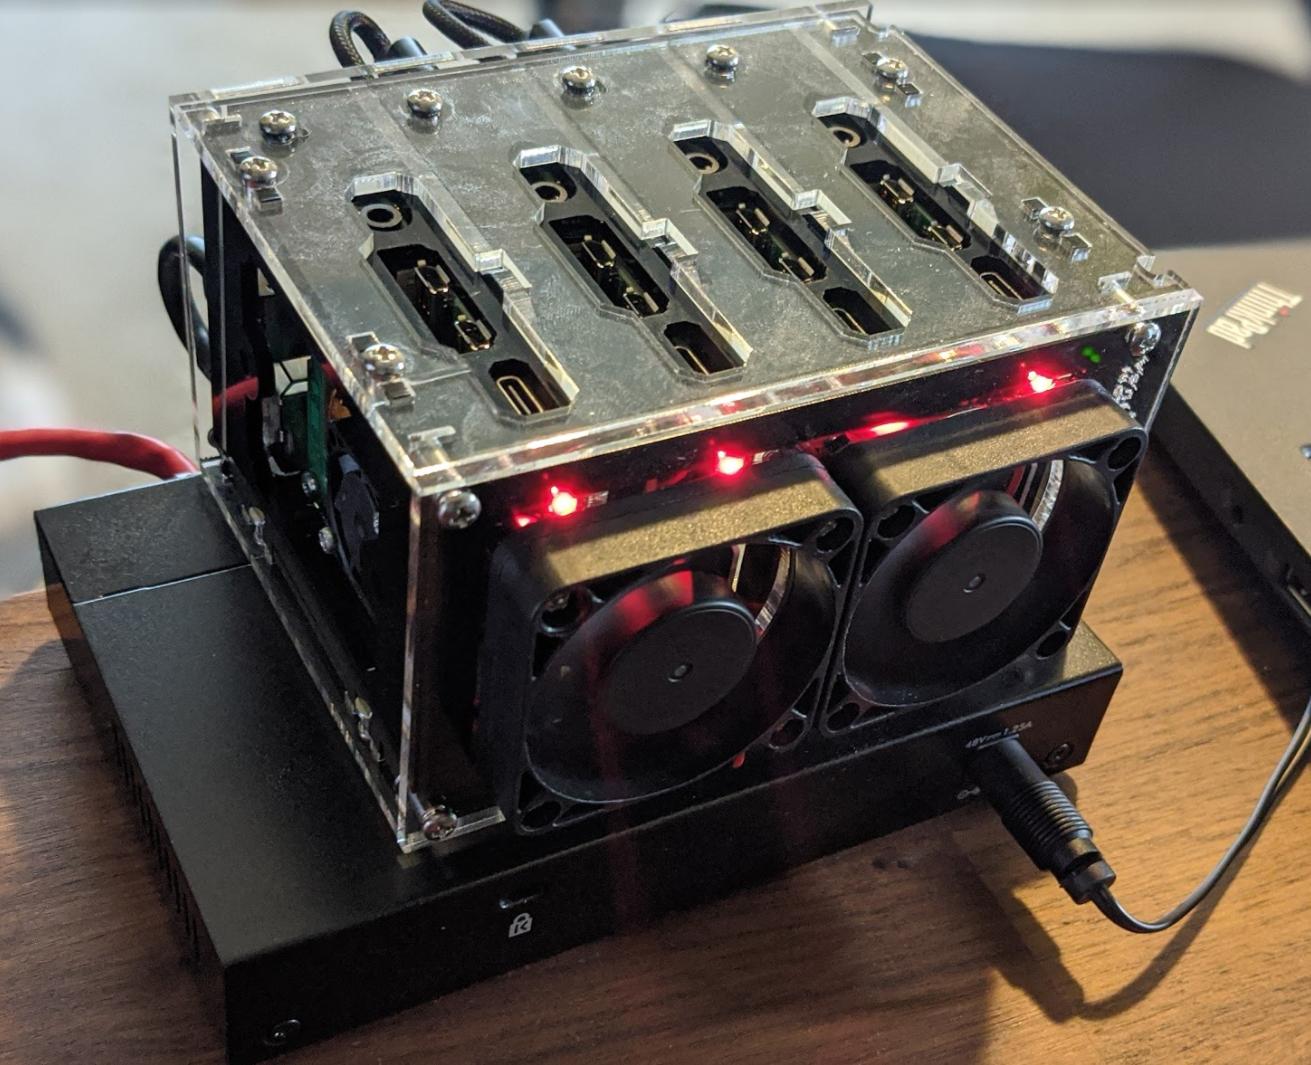
The hardware
I had some of these parts lying around or reused things like SD cards from older Pis.
| Item | Qty. | Price | Purpose |
|---|---|---|---|
| Raspberry Pi 4 4GB | 4 | $55 | Compute |
| Raspberry Pi POE HAT | 4 | $20 | One less wire needed, power the Pi’s with the network cable |
| Samsung 32GB EVO MicroSD | 4 | $8 | Storage for Pi’s |
| CAT5 cable (6") | 4 | ?? | Network cables I had |
| NETGEAR GS305P 55w POE switch | 1 | $60 | Power and network |
| C4Labs Bramble Case | 1 | $35 | Cluster case* |
Warning
*I would not recommend this case to anyone. It is hard to assemble and the POE HATs barely fit. I also had to rewire the case fans since the GPIO pins were in use. If I did this project over again, I would purchase an open stackable case.
Setup
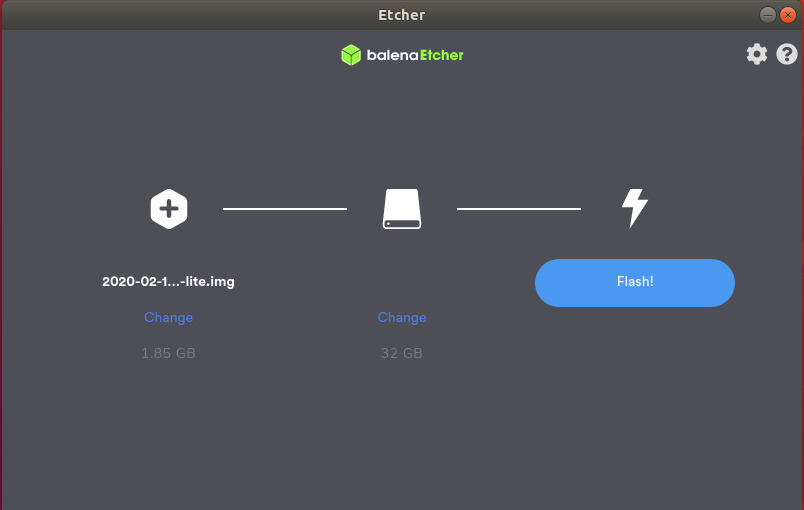
Flash the SD card with Raspbian Lite
-
Download the latest Raspbian Lite zip

-
Flash the SD card using balenaEtcher
-
Enable SSH
SSH is disabled by default in Raspberry Pi; luckily, you can enable it with an empty file called
sshin the/boot/directory.On Ubuntu:
touch /img/jimangel/boot/sshOn macOS:
sudo touch /Volumes/boot/sshMore detailed instructions, including Windows, can be found here
Once flashed and SSH enabled, insert the SD card into Pi.
Find it on the network
Since there are four similar devices, I power them on one at a time. I have the POE switch plugged into my primary network, so the Raspberry Pis receive DHCP when booting.
For added peace of mind, I created static maps for the Pi’s MAC address. I set the configurations using the router’s GUI.

If you can’t get the IP addresses quickly, you can always plug in a monitor & keyboard for initial discovery. The Raspberry Pi 4 uses micro HDMI for video out. Alternatively, you can create a static IP.
Write the IP’s down in a notepad for later use.
192.168.7.147 raspberrypi-case-0
192.168.7.243 raspberrypi-case-1
192.168.7.198 raspberrypi-case-2
192.168.7.194 raspberrypi-case-3
Copy your SSH key to each Pi
SSH keys are used for authentication to access the Raspberry Pi nodes without passwords.
Do you have an ssh key? Check with:
ls -l ~/.ssh/id_rsa.pub
If it says file not found, then generate a key-pair for use with SSH with:
# hit enter to everything
ssh-keygen
If the file does exist, copy it to each node using ssh-copy-id:
Note
Default SSH user is pi, and the password is raspberry.
ssh-copy-id pi@NODE_IP_ADDRESS_0
ssh-copy-id pi@NODE_IP_ADDRESS_1
ssh-copy-id pi@NODE_IP_ADDRESS_2
ssh-copy-id pi@NODE_IP_ADDRESS_3
Test the key by running ssh pi@NODE_IP_ADDRESS_#. It should not prompt for a password. If it does, something went wrong. Do not proceed.
Warning
The Ansible playbook removes password based authentication
Kubernetes config
Since I’m building Kubernetes from binaries to test alpha/beta releases, there isn’t an automated way to include dependencies. To solve this, I’ve included some resources below to help find dependencies. The dependencies can be set in the inventory.yaml file; discussed more later.
Check the default versions section for the most up-to-date components used. An overview of what is installed at the time of writing:
- Docker 19.03.11
- found in upstream dependencies and GitHub releases
- crictl (cri-tools) v1.18.0
- found in upstream dependencies and GitHub version matrix
- kubernetes-cni v0.8.5
- found in upstream dependencies and GitHub releases
- kubernetes binaries (kubeadm, kubelet, kubectl) v1.19.0-beta.0
- check GitHub releases page for the exact tag format
- alternative examples:
- v1.19.0-alpha.3
- v1.18.2-beta.0
- v1.17.0-rc.1 (release candidate)
- You can use actual releases, for example, v1.18.3, but I recommend using another tutorial that installs the components via Debian packages.
- The files downloaded also include the docker images for the control plane.
For the CNI (Kubernetes networking), Ansible installs the latest Weave Net since it supports ARM processors and is more active than Flannel. If you’d like to use Flannel, modify roles/k8s-controlplane-up/handlers/main.yaml to apply the configuration. You may also need to specify a pod networking CIDR in kind: ClusterConfiguration of files/kubeadm-config.j2 like:
networking:
  podSubnet: 10.244.0.0/16
Bootstrap the cluster with Ansible
The entire setup and installation are done via Ansible, a configuration management tool.
-
Install Ansible
-
Clone the Ansible playbook
git clone https://github.com/jimangel/pre-release-k8s-on-pi.git cd pre-release-k8s-on-pi -
Add the node IPs to the
inventory.yamlfile. Theinventory.yamlfile also includes all the variables needed to bootstrap the cluster.all: hosts: # Use only IP addresses here! raspberrypi-case-0: ansible_host: 192.168.7.147 raspberrypi-case-1: ansible_host: 192.168.7.243 raspberrypi-case-2: ansible_host: 192.168.7.198 raspberrypi-case-3: ansible_host: 192.168.7.194 ...(optional) change the custom variables
... vars: ansible_python_interpreter: /usr/bin/python3 ansible_connection: ssh ansible_user: pi # https://github.com/kubernetes/kubernetes/blob/master/build/dependencies.yaml kubernetes_version: "v1.19.0-beta.0" kubernetes_cni_version: "v0.8.6" kubernetes_crictl_cri_version: "v1.18.0" docker_version: "19.03.11" # kubeadm config setup cluster_name: ansible-pi # the join token expires after 2 hours join_token: z1km0i.ygllcb4ulis8ywgw -
Test general SSH connectivity
ansible all -m pingOutput looks similar to:
raspberrypi-case-2 | SUCCESS => { "changed": false, "ping": "pong" } raspberrypi-case-0 | SUCCESS => { "changed": false, "ping": "pong" } raspberrypi-case-3 | SUCCESS => { "changed": false, "ping": "pong" } raspberrypi-case-1 | SUCCESS => { "changed": false, "ping": "pong" } -
Run the playbook
ansible-playbook playbooks/up.yamlIt takes around 15 minutes to run due to the large binary downloads and reboot.
(optional) Copy the
admin.confkubeconfig file to your local workstation with:ansible-playbook playbooks/copy-admin-kubeconf.yamlThe
copy-admin-kubeconf.yamlplaybook copies the admin.conf to the current directory, to get pods try:kubectl --kubeconfig=admin.conf get pods -ATo permanently use the
admin.conffile, add it to your kubeconfig environment:export KUBECONFIG=$KUBECONFIG:admin.conf kubectl config use-context kubernetes-admin@ansible-pi kubectl get nodesThe output looks similar to:
NAME                 STATUS   ROLES    AGE     VERSION
raspberrypi-case-0   Ready    master   5m51s   v1.19.0-beta.0
raspberrypi-case-1   Ready    <none>   4m6s    v1.19.0-beta.0
raspberrypi-case-2   Ready    <none>   4m3s    v1.19.0-beta.0
raspberrypi-case-3   Ready    <none>   4m7s    v1.19.0-beta.0
If desired, you also can ssh into the control plane node and run kubectl commands from there.
Test
On your local workstation, after copying the kubeconfig file, run:
kubectl create deployment nginx --image=nginx
Verify the pod is running with kubectl get pods
NAME                    READY   STATUS    RESTARTS   AGE
nginx-f89759699-4htnw   1/1     Running   0          48s
Expose and forward the service port to your local workstation:
kubectl expose deployment/nginx --port 80
kubectl port-forward deployment/nginx 8080:80
Browse to localhost:8080

Clean up
The following will remove all components created, bringing the Raspberry Pis close to the “default” image state and does not uninstall docker.
ansible-playbook playbooks/reset.yaml
To include removal of docker:
ansible-playbook playbooks/reset.yaml --tags "all,delete-docker"
To reset only kubeadm on all nodes:
ansible-playbook playbooks/reset.yaml --tags "kubeadm-only"
Of course, the only 100% cleanup is reformatting the SD cards.
After cleaning up, you re-run the script again or change the parameters. For example:
ansible-playbook playbooks/up.yaml --extra-vars "kubernetes_version=v1.18.2-beta.0"

kubectl get nodes
The output looks similar to:
NAME                 STATUS   ROLES    AGE     VERSION
raspberrypi-case-0   Ready    master   6m37s   v1.18.2-beta.0
raspberrypi-case-1   Ready    <none>   45s     v1.18.2-beta.0
raspberrypi-case-2   Ready    <none>   43s     v1.18.2-beta.0
raspberrypi-case-3   Ready    <none>   43s     v1.18.2-beta.0
Ansible playbook breakdown
ansible.cfg tells Ansible to use inventory.yaml for your hosts. The inside of inventory.yaml contains the host IP mappings and children groupings such as k8s_controlplane and k8s_worker to apply roles selectively.
The files/ directory contains systemd configuration files for kubelet, kubeadm, and the kubeadm config template. If you install from Debian packages (as the docs recommend), everything, except the kubeadm config, is created automatically.
The img/ directory contains GitHub repo images.
The playbooks/ directory is the main source. It contains *.yaml files with instruction sets of which hosts to apply specific roles.
The next most crucial directory is roles/ which contains instruction sets for each module to execute on the host nodes. If interested, here’s a deep dive into Ansible roles here. We have:
raspberry-pi-up/- contains instructions that should apply to every Raspberry Pi
k8s-commons-up/- contains instructions that should apply to every k8s node
k8s-controlplane-up/- contains instructions that should only apply to controlplane nodes
k8s-worker-up/- contains instructions that should only apply to worker nodes
├── ansible.cfg
├── files
│   ├── 10-kubeadm.conf
│   ├── kubeadm-config.j2
│   └── kubelet.service
├── img
│   └── pi.jpg
├── inventory.yaml
├── playbooks
│   ├── copy-admin-kubeconf.yaml
│   └── up.yaml
├── README.md
└── roles
    ├── k8s-commons-up
    │   ├── defaults
    │   │   └── main.yaml
    │   └── tasks
    │       └── main.yaml
    ├── k8s-controlplane-up
    │   ├── defaults
    │   │   └── main.yaml
    │   ├── handlers
    │   │   └── main.yaml
    │   └── tasks
    │       └── main.yaml
    ├── k8s-worker-up
    │   ├── defaults
    │   │   └── main.yaml
    │   └── tasks
    │       └── main.yaml
    └── raspberry-pi-up
        ├── defaults
        │   └── main.yaml
        ├── handlers
        │   └── main.yaml
        └── tasks
            └── main.yaml
Inside of the roles, you’ll commonly see three directories defaults/, tasks/, and handlers/.
defaults/- tells the role to use sudo for all tasks
tasks/- actions of what needs to be done via Ansible (install, copy, run, etc.)
handlers/- actions that can be notified by tasks (such as “reboot” after this task)
- for example, a handler is used to install the CNI after the controlplane is initialized
The main.yaml files are the instructions for each sub-role directory.
Advanced Ansible testing
Run playbook on a single node with --limit:
ansible-playbook playbooks/up.yaml --limit "raspberrypi-case-2"
Run specific playbook steps with --tags:
ansible-playbook playbooks/up.yaml --limit "raspberrypi-case-2" --tags "kubernetes-status"
If you want to add another worker node after the token has expired, generate a new token on the control plane:
kubeadm token create --print-join-command
Update inventory.yaml with the new hostname and IP:
ansible-playbook playbooks/up.yaml --limit "raspberrypi-case-NEW_HOST" --extra-vars "join_token=GENERATED_JOIN_TOKEN"
Wrap Up
My playbooks are meant to be non-destructive; feel free to tweak and re-run with various parameters. If you do anything extraordinary, please PR it back to the repo. 🙂
I didn’t get a chance to test the inlets operator but that is next on my to-do list.
I would like to add upgrade and tear down playbooks. If you’re interested in upgrading your cluster by hand, please check out the upstream Kubernetes version skew policy.
Raspberry Pi introduced beta booting from a USB in May of 2020, which is mainly targeted at external SSD drives. However, I am interested if this improves performance and reliability over MicroSD cards when using a small USB 3.0 thumb drive.
Thanks
The following sites heavily influenced this article:
- https://illegalexception.schlichtherle.de/kubernetes/2019/09/12/provisioning-a-kubernetes-cluster-on-raspberry-pi-with-ansible/
- https://blog.alexellis.io/test-drive-k3s-on-raspberry-pi/
- https://github.com/teamserverless/k8s-on-raspbian/blob/master/GUIDE.md
kubeadm pre-release build reference: